Plugin of the Week: Sharedaddy plugin

A few weeks ago we looked at Automattic’s Jetpack plugin which adds a plethora of new features for WordPress. One of the more useful plugins incliuded in this swiss army knife of plugins is the Sharedaddy plugin which adds “share” buttons for Facebook, Twitter, Digg, and others onto your WordPress site. Did you know you can get Shareaddy as a standalone plugin too?

Once you install the Sharedaddy plugin (alone or as part of Jetpack), you’ll need to configure which types of sharing you’ll want to show on your WordPress site. You have your choice of Stumbleupon, Facebook, Twitter, Email, Digg, Reddit, and Print services.

Here’s where our (two) tips/tricks comes in:
You’ll notice two areas below where you can drag the type of sharing services you want to enable. If you drag the sharing service icons to the left, they’ll be shown in order exactly as you see on the screen. If you drag the icons over to the right, the services will be hidden under a main “Share+” button.

This part might be confusing for users so here’s a quick diagram. You can see the results of this on the bottom of this actual post.

Sharedaddy services

If you’re an advanced user looking to customize the plugin, we converted Sharedaddy into a shortcode plugin for use in one of our client’s custom themes and it has worked well so far. We were able to use CSS to add a colored background and make alignment modifications without much problems.

We were previously fans of the Sociable plugin but with the total lack of paid support provided by WPMU (Inscub) and the developer, we have moved on to Sharedaddy. It is probably the best out of the box solution out there for easy content sharing on your WordPress site.

Update plus 2nd tip: The biggest issue we ran into is that once the plugin is installed and activated, it doesn’t automatically turn on a set of default sharing buttons. So if you just activate it, you still need to define the social networks you want to show up.

We can see a situation where a user may just activate the plugin and forget to actually add popular networks like Facebook and Twitter. So our second tip, is that if you’re moving your site to another server, don’t forget to check and add the services manually otherwise you won’t notice they’re not there until you’re reading your published pages. Yes, we learned this the hardway! Also this would most likely apply to the version of Sharedaddy bundled with Jetpack.

Get it: Sharedaddy plugin

Automattic releases JetPack plugins for self hosted WP sites

Automattic has just released a swiss army knife of plugins for WordPress self hosted sites called Jetpack. It includes traffic stats, a Twitter Widget, Gravatar Hovercards, URL shortener, social network sharing buttons, LaTeX for mathematicians/scientists, grammar/spell checker, and other shortcodes.

You’ll need to have or create a WordPress.com to activate it’s features. Here’s a screenshot once it’s installed, activated, and hooked up to WP.com. Click for larger size screenshots.

We activated the share feature on our UXJobsLA.com site…

…and it seems to have some hiccups with an older WordPress theme and possible conflicts with another plugin.

Below is the “After the Deadline” plugin settings for proof reading.

Stay tuned for a full review later today.

Get it: Jetpack

Take “posts” to the next level with four WordPress plugins

One of the most confusing things for new WordPress users is understanding the difference between posts and pages. We won’t attempt to re-hash this subject as there are plenty of good references but here’s our take to tee up the purpose of this article.

We like to think of “posts” as a chronological stream of content a.k.a. a blog. You could also think of posts as “chunks” of content and you could relate or “tie” them together when you use the taxonomy features of WordPress by selecting categories, tags, and now “post types” in WordPress v3.1 for posts that you create.

We would then define “pages” as a way to have a static web page of content, for example an “About” or “Contact” pages. Pages are usually not updated as often as a posts. Technically, behind the scenes in WordPress there’s very little difference between posts and pages.

Finding flexible ways to show posts
So what if you want to have a “page” on the navigation bar to pull in blog posts within a certain category or tag? You could build a new page template by editing and creating some PHP but that’s a headache when you could use WordPress plugins to the same thing, right?

We found three indispensable plugins that will make your life easier if you want to create “pages” by pulling in and controlling content from your posts.

A real life scenario
Here’s an example, say you wanted to create a WordPress site with job listings. You could enter in the various open job positions into the posts editor and add tags and/or categorize them. Then you could setup pages on the navigation bar with labels like “mobile” or “PHP”. Then you could use a plugin that would pull in only job posts matching that taxonomy.

Both of these plugins, once you activate them, all you have to do is create your new page and then paste in the shortcode with some parameters like the ID number of the category or tags. We haven’t tried using them both at the same time but they definitely work on their own on some of our real life sites.

So the first plugin is called Posts by Tags for use when you want to create a page filled with posts from tags. All you do simply is paste in shortcode like this into your page editor:

[posts-by-tag tags = "tag1, tag2"][/posts-by-tag]

Simply replace 1 (and 2) with your tag ID number(s) to have that page show only posts matching those tags. We’ve noticed on certain templates you don’t have to put in the ending tag because it will show up on the published site.

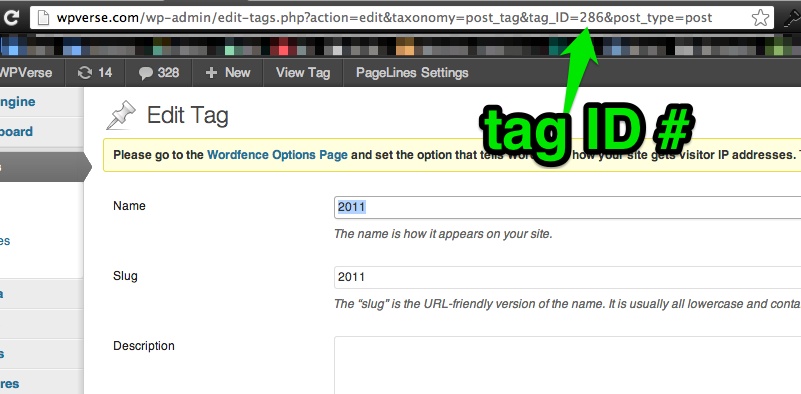
On a side note, so how do you know what your tag ID numbers are? When you’re editing the tags in WordPress admin, look for the ID number in the URL string at the top of the page like in the screenshot:

tag-id

And yes, there is also an plugin to show your ID numbers (newer more recently) updated plugin to show that info in the WP admin pages showing all your pages, posts, tags, categories, etc.

Publishing posts by Categories
So what if you want to show posts based on categories instead of tags? Give List Category Posts a try. This one was recently updated so it works with WordPress 3.1. It works in a similar way to the tag plugin but lets you use category names as well as ID numbers. In fact List Category will also support tags so if you’re looking for an all-in-one solution, give this one a try first.

The other way to publish “pages” of posts
Yes, there is another way to reproduce this type of site structure by simply using WordPress 3x’s navigation bar menu builder to create URL based queries for the tags or categories (example: /category/name-of-cateogry/). However using this method, you wouldn’t have the ability to add (type out) content around the posts either at the top or the bottom of the page.

Hide posts without a need for password
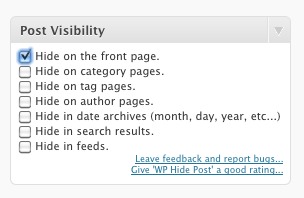
And the final plugin that you’ll want to try out is WP Hide Posts. This one might be helpful even if you don’t need to pull in posts into pages. With WP Hide Posts, you can hide certain posts from appearing on the home page or other post pages.

It’s useful if you want to write a “test” post that you didn’t want the general public to see yet on the home page. For example you had an announcement that you were working on with a copy writer but didn’t want to give them access to WordPress admin but wanted them to look at it first without the public seeing it.

Wp hide posts

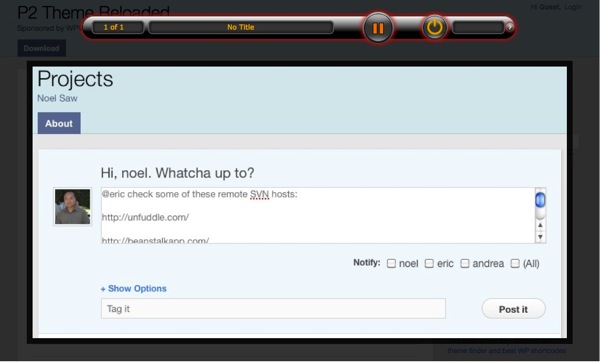
Think of it as a way to have a “quasi-hidden” posts category that doesn’t require a password for anyone to see that posts. You can email people the URL of that post without a password required. We’ve used WP Hide Posts on our P2 reloaded site to hide posts related to revision history that don’t need to appear on the home page.

Note that users may still be able to find your post if they are using a tag/category cloud widget, so that’s what we mean by “quasi-hidden” so if it’s something top secret, password protect it.

So we’ve talked a bit about four very powerful posts tools for WordPress that will let you expand the way you think posts normally work in WordPress. You can use these tools to write, organize, and publish information in WordPress that you normally wouldn’t think of.

Get it: Posts by Tags | Show IDs | List Category Posts | WP Hide Posts

Quick roundup of 3 lightbox plugins

Here’s a feature that content creators usually seek out upon starting out with WordPress: Lightbox plugins. What’s a “lightbox?” Click on any of the screenshots below to see an example.

Unfortunately for now, WordPress doesn’t have this as a standard feature, so new users have to search for a suitable plugin for their WordPress installation.

Let’s take a look at three photo lightbox plugins that maybe suitable for your particular need.

Let’s first take a look at Simple Lightbox. In our experience, it works well on WP sites that don’t have a lot of other plugins installed. Once the plugin is activated, you won’t have much else to do as it will automatically insert itself into pictures when you use the media button in the post / page editor as long as you follow our notes near the bottom of the review. Click the thumbnail of the simple lightbox settings below to see it in action.

We found the second plugin, Photo Lightbox, also works well on WordPress sites that have a minimal set of plugins that are activated. Like Simple Lightbox, it will automatically link up your photos as long as you use the insert media command. The only thing is that it adds a somewhat gaudy slideshow media player buttons at the top of the page.

Note: When using both plugins above, we noticed that new installations of WordPress may specify the link URL as an “attachment,” so make sure you click on “File URL” (see below) as the the target otherwise the plugin won’t work.

Wp upload media

The third plugin is not a traditional plugin but part of library of shortcodes sold at Evnato’s Code Canyon called Styles with Shortcodes. The library offers an extensive set of useful WordPress functions including social network icons, block quotes, Google maps, tables, and more. This particular solution is not as user friendly as the other two plugins reviewed here but we were able to get it to work in our environment with ten active plugins.

The steps to use this plugin require more manual work as it doesn’t automatically link up pictures using the usual WordPress workflow. First, you upload the picture using the standard WordPress media dialog box. Copy the uploaded image path into your clipboard. Then click on the “S” button that appears on the toolbar. Then you have to copy/paste the URLs and enter in various settings into the dialog box shown here:

[sws_overlay src=”http://wpverse.com/wp-content/uploads/2011/02/codecanyon-wp-shortcodes-lightbox-dialogbox.jpg” title=”” subtitle=”” description=”Shortcodes Overlay lightbox” thumb_width=”404″ thumb_height=”273″ icon=”red” Align=””] [/sws_overlay]

We wish there was a fourth contender, as we used to use Flexible Lightbox but the developer stopped updating it about a year ago and we haven’t had any luck with it since WordPress 3.0.1.

Let us know what your favorite lightbox plugin is and why you like it.

Two finds of the day: Another WP theme finder and best WP shortcodes

Here’s another WordPress theme finder, that’s not as visual as WP Candy’s but nevertheless may be useful for some. It’s called QualiThemes. We like it as it includes both free and commercial themes and you can rate them. Our nitpicks: the original theme developer doesn’t get listed on the page and the drop down menus to filter the themes could use some visual work and spacing.

Qualithemes

We also noticed there’s a huge list of awesome WPshortcodes at WordPress Answers by Stack Exchange including: delay RSS posts, add excerpts to pages, customize the order of the admin menu navigation, and profile the database performance.

Get it: QualiThemes | WordPress Answers


Quick Tip: Add a smooth call to action button anywhere

Here’s a time saver, if you want to add a nice looking “call to action” (CTA) button like “Signup” or “Download” to your site. Normally that would require a lot of steps: design it in Photoshop, upload a graphic into the media library, and then insert it into your post. And then link it up. Wow, that’s a lot of steps and time.

Well there’s a WordPress plugin to speed that process up a lot – try WP CSS Button plugin and use their short code almost anywhere on the site to display a button like this:
[CSSBUTTON target=”http://startupsinsider.net” color=”FF8A00″ textcolor=”ffffff”]Signup[/CSSBUTTON]
Once the plugin is installed and activated, you simply insert this shortcode in your post editor:

[CSSBUTTON target="http://startupsinsider.net" color="FF8A00" textcolor="ffffff"]Signup[/CSSBUTTON]

You can also replace the hex button text/background color and hyperlink with anything you’d like. And here’s a tip from us, if your site shows an underlining effect on the left/right side, insert this code to the bottom of your theme’s CSS file to hide it.
.button_col a { border-bottom: none; }

Once you make the 2-3 min. investment in time, adding nice looking buttons could take just seconds!

Get it: WP CSS Button plugin

My Obsession: Speeding up WordPress

In the past few months, I’ve been obsessed almost daily with speeding up my litany of WordPress sites. Having relevant, well written content plus a fast site is a way to get readers to keep coming back and search engines now take content plus speed into account.

I’ve tried quite a few plugins and services. Some of them were easy to use and some were not so easy to use. I also wanted to distill a ton of information and experience into a practical and do-able mini tutorial.

I’ll work on a more definitive full featured article but in lieu of that, here’s the combination of tools that speed up WordPress sites in my experience. You can follow these in gradual steps to crank up the speed of your WP site. One assumption is that you’re hosting your site on a decent, tier 1 web hosting company like Media Temple. None of these plugins will speed up your WordPress site if the foundation is not solid – if your web host is slow. But that’s anther discussion.

WP Super Cache
The best plugin to start with is WP Super Cache for most people. WP Super Cache (WP SC) is relatively easy with a simple on/off switch. Most of the defaults settings will work out of the box for everyone. Just install the plugin, then activate, and click the “on” button.

What’s the downside of a cache plugin? Sometimes if you make changes to your site, it will take a few forced refreshes on your web browser to see the updates. Or you’ll need to delete the cache in WP SC settings or turn it off temporarily.

Just in case, you didn’t know these caching plugins create temporary “static” HTML versions of your web pages so the server doesn’t have to generate these pages “dynamically” like WordPress normally does. Serving up a static HTML page is usually much faster than serving up normal WordPress page.

An alternative I’ve tried is W3 Total Cache (W3 TC) plugin – it has a whole kitchen sink approach which can be really confusing for new users. Plus I can never stop complaining that the labels used for on/off/preview modes are confusing for most people.

WP Super Cache doesn’t have the whole kitchen sink like W3 TC but that’s where the next plugin (Autoptimize) supplements WP SC.

Autoptimze
I wrote about Autoptimize a few days ago. It optimizes and compresses your HTML, CSS, and Javascript code. It works well with most plugins but it may once in awhile make your home page slightly look a little weird (images may be offset by a few pixels). But it’s easy to turn on or off. There’s only a handful of settings, so you can’t really hurt anything. Plus Autoptimize works in tandem with WP Super Cache according to the plugin developer! So this combo does the work of W3 Total Cache without the confusing UI.

Content Delivery Network
What’s a CDN (Content Delivery Network)? In simple terms, it’s a paid service that automatically downloads all your images, CSS, and javascript files into their “system.” The CDN system comprises of web servers at multiple, strategic geographical locations.

Once you signup with a CDN provider, their system will automatically copy commonly used images, CSS, and JS files onto their CDN servers. Then using a WordPress plugin like WP Super Cache, that plugin will automatically switch over the source of image, CSS, and javascript sources to the fastest CDN server closest to you.

Both WP Super Cache and Autoptimize plugins have CDN support but I recommend you use the CDN support in WP Super Cache . I noticed that Autoptimize seems to have a bug with sourcing PHP files for the CDN.

Now this is where the hard part comes. Which CDN provider do you signup with? I looked at using Amazon’s Cloudfront but the pricing and setup instructions gave me a headache. After some research, I’d found a WordPress knowledgeable/savy CDN service called WP CDN. Once you’re signed up, they’ll send you instructions on the server names you paste into either plugin.

The WP CDN people were extremely helpful and answered all my crazy questions very responsively. Plus it starts at only $6/month with no setup fees up to 5 domains, so you can’t really go wrong.

All in all, I’ve seen the combination of these three tools speed up my WordPress sites by an average of 2-3 seconds on long blog pages like StartupInsider.net or even this site.

Get it: WP Super Cache | AutoptimizeWP CDN

Related posts: WP Super Cache | Autoptimize

Creating tabbed content

If you need to have a ton of content to be presented on single page it can be challenging so the reader doesn’t become overwhelmed. Dividing your content into a tabbed module is one possible solution It’s especially helpful if one section of content is going to be really long (tall) and the user may want to jump ahead to a different section. One way to do that would be by putting the content into tabs on a single page.

Some possible use cases are for product reviews which could be broken up into: intro, review, and conclusion. Here’s a quick example – click on tabs!

{tab=Intro}
The product was designed by ACME in 2010. Steve Ive and Johnny Jobs collaborated on this brilliant design.
{tab=Review}
Lorem ipsum dolor sit amet, consectetur adipisicing elit, sed do eiusmod tempor incididunt ut labore et dolore magna aliqua. Ut enim ad minim veniam, quis nostrud exercitation ullamco laboris nisi ut aliquip ex ea commodo consequat. Duis aute irure dolor in reprehenderit in voluptate velit esse cillum dolore eu fugiat nulla pariatur. Excepteur sint occaecat cupidatat non proident, sunt in culpa qui officia deserunt mollit anim id est laborum.
{tab=Conclusion}
It’s a great product! Buy it today
{/tabs}

So how do you do this with WordPress? We ran across this plugin called “WordPress Tabs Slides” and it works brilliantly. It’s Ajax driven so it’s almost instantaneous and the user doesn’t feel like they’re being taken onto another page. You use very simple shortcode to mark sections in your content within your post or page and you’re done.

Congrats and thanks to Abdul Ibad for coding a great plugin for the WordPress community.