Converting posts to pages and vice versa with pType Converter

Have you ever accidentally created a post when you intended to create a page? Sure you could cut and paste the content again. No big deal right?

There’s a more serious issue once you try to delete the post and you’re using a base category plugin. After you create a new page, you may have noticed you can’t use the original permalink that WordPress automatically + originally generated for the post. WordPress will append a number to the end of the permalink URL of your new page and you can’t get the original permalink back.

For example if your post title was “keyword” and saved it. If you try to create a new page with “keyword”, WordPress will create the permalink as “keyword-2”.

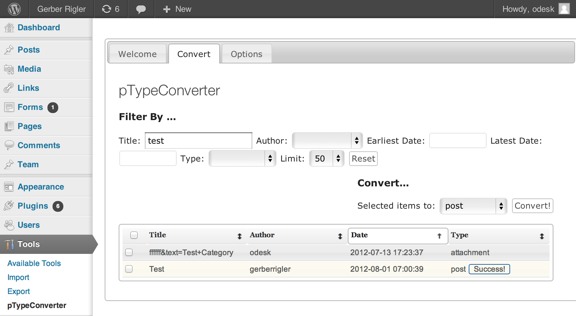
A work around for both issues is to convert that post into page using the pType Converter plugin. The plugin adds an item in the “tools” menu with the interface below. You can type in a keyword and it will find matching posts, pages, or even attachments.

Ptypeconverter

Next click on the checkbox(es) to the posts or pages that were found that you wanted to be converted. Then click on the drop down to select the type you want to convert it into and then click on “Convert” button.

Here’s some WordPress trivia: for the most part posts and pages are essentially the same thing so doing the conversion is fairly safe but as always use a plugin like Backup Buddy to backup your site whenever you make major changes. 

Get it: pType Converter

Visual WordPress Sitemap theme

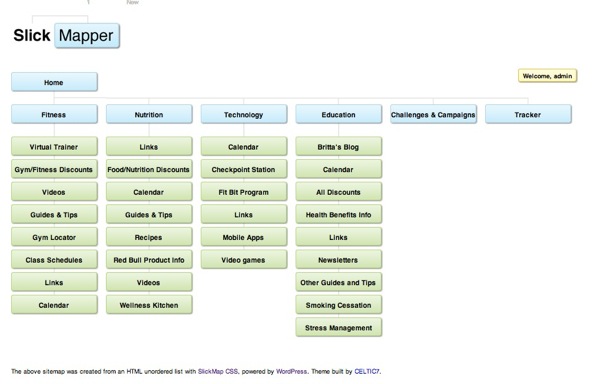
Slickmapper sitemap pages wordpress themeIf you’re building a WordPress site with over 20 pages, in addition to the “bulk post creator” plugin we mentioned a few days ago, you might want to try out the Slick Mapper WordPress theme by Luke McDonald. This will allow you to get the landscape overview of how pages fit within the site and help you map out navigation bar issues more effectively. This is known as part of the information architecture portion of User Experience (UX) jargon these days.

Once it’s activated, Luke’s sitemap theme will generate a visual site map that you can see at the web site URL just like your home page. Site maps are normally often seen in Visio or other drawing program. The beauty of this theme is that the theme generates a site map using the pages saved into WordPress. The theme will structure the pages into parent and child hierarchy. Just make sure your pages are published – not saved in draft mode.

There are quite a few options available to customize such as the box background and border colors and logo upload.

If you want to keep your current theme running, simply use the old theme preview trick by adding this line of text to the end of your base URL like this:

?preview=1&template=thelukemcdonald-slickmapper-bb1ebf4&stylesheet=thelukemcdonald-slickmapper-bb1ebf4

So if your site is was domain.com, then it would look like this:

http://domain.com/?preview=1&template=thelukemcdonald-slickmapper-bb1ebf4&stylesheet=thelukemcdonald-slickmapper-bb1ebf4

The current info page for SlickMapper at ThemeGarden is down so check out the GitHub page for the download: SlickMapper

How to bulk edit post attributes/settings

Here are three tips and tricks in case you ever need to edit the attributes for a ton of posts or pages and avoid sitting there for hours manually adjusting each post.

Tip one answers the question: How do I bulk edit the attributes for a bunch of posts?

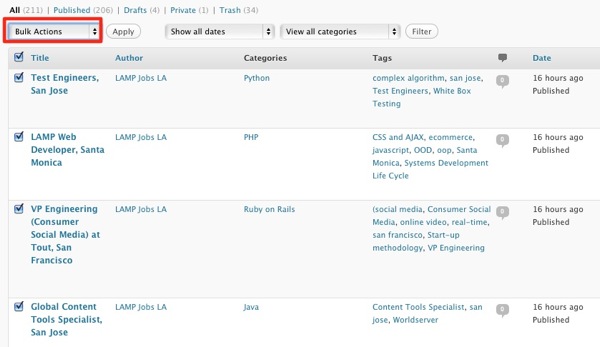
For example if you wanted to close the discussion/comments for a bunch of posts without having to manually edit or even quick edit each post? Here’s how. When you’re in the WP admin posts listing page, click on the checkbox on the top far left column (next to Title) to have the system select all posts on the screen. Or click on the checkbox for which ever posts you want changed. Next click on the “Bulk Actions” drop down right above the select all checkbox.

Wordpress posts bulk select

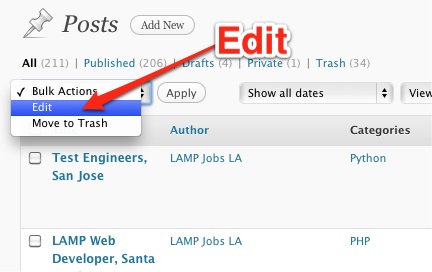
One of the drop down items under “Bulk Actions” is “Edit”. Click “Edit” and then “Apply” button.

Wordpress posts bulk edit3

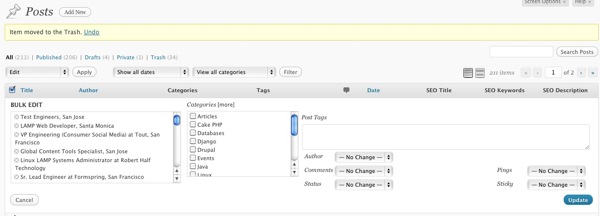
Then you’ll then see a screen like this:

Wordpress posts bulk edit2

Here you can apply a set of the same category(s), change the author, set comment/discussion status to the all the posts you’ve selected. Remember, once you click on “Update” – there’s no undo for your actions. So while its powerful tool, it can also be dangerous.

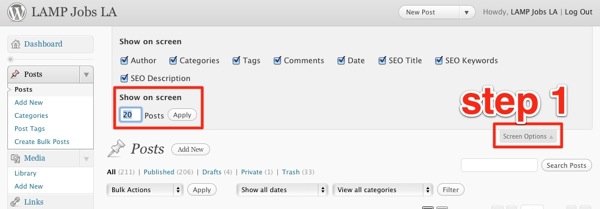
Tip two is: What if I have a 100 posts and don’t want to click-through 5 pages of posts? Did you know that you can define how many posts will show up per post listing page? WordPress normally shows 20 posts per page but you can set it up to 200. Once you’re in the posts listing page, click on “Screen Options” near the top right and you’ll see the “Show on-screen” field magically appear. Don’t forget to click on “Apply.”

Wordpress posts on screen limit

So both tips one and two could help an admin who needs to bulk edit the attributes for 100s of posts and wants to avoid having to browse through multiple pages of posts. Simply set the “show on-screen” field to “200”, click apply, and then bulk edit all the posts.

Tip 3 is for more advanced WordPress designers. Have you ever needed to know what ID numbers are your posts, categories, tags, links, and media without having to decipher the hyperlink in the status bar? Give “WP Show IDs” a try. It will add a new column to all your admin listings that show IDs on the far right column. It works great in conjunction with plugins that use shortcodes and require IDs like List Category Posts (which displays select blog posts on defined pages).

My favorite plugins of 2011 (so far)

A lot of people ask me what are my favorite WordPress plugins. So here they are in alphabetical order as of June.

I’ve covered a lot of these plugins already but I might omitted a few of them and some of them are new ones I’ve discovered from fellow WordPress designers and developers (like Natalie MacLees of the SoCal WordPress meetup group). All of these are available through the WordPress.org repository so they should be malware free and well-tested. And the beautiful thing is that I have most of the 20+ plugins all running here on WPVerse without any conflicts as far as I can tell.

Click on the Plugin name to go to the WordPress.org plugin page.

After the Deadline (also available as part of Jetpack)
Replaces the built-in spell checker with better spell and grammar checker.

Autoptimize
Speed up your WordPress site easily through HTML/CSS and Javascript optimization.

Bad Behavior
Reduce Spam comments from your site

Contact Form 7
One of the easiest ways to set up a quick contact form.

Enable Media Replace
Overwrite existing media library images without deleting them first.

Hikari Category Permalink
Gives you more control over the way posts appear in the URL using categories.

Google Analyticator
Great way to add Goole Analytics track coding and show summary report on your admin dashboard

Google XML Sitemaps
Works in conjunction with SEO plugins to help search engines crawl your site more accurately.

Import Blogroll with Categories
Lets you import links (blogroll) with categories intact

la petite url
Great URL shortner using your own domain

NextGen Gallery
A grand daddy of WordPress plugins that allows you to quickly build WordPress thumbnails and picture galleries. There are tons of add-on plugins to extend it even further.

Page Links To
Redirect pages or post to other URLs.

Relevanssi
Enhances WordPress’ built in search function to make it easy for visitors to find content.

Search and Replace
Just wrote about this powerful (and dangerous) tool a few days ago to let you search/replace the WordPress database tables.

Sharedaddy (also available as part of Jetpack)
Allows your visitors to share pages and post with a few clicks. Initial setup could be a lot easier but still a good plugin.

Simple Lightbox
Easily replace full size image links to lightbox viewer.

Twitter Goodies Widget
Nice looking Twitter widget to show your tweets on your sidebar with customizable color schemes.

Widgets Reloaded
Replaces some of the built-in widgets that come with WordPress including a better version of archives, authors, bookmarks (blogroll), calendar, categories, navigation, pages, search, and tags. Some of the widgets like bookmarks are extensive upgrades while others like calendar aren’t as complex.

WP Super Cache
The “That was easy” way to speed up your WordPress site. Can work in conjunction with Autoptimize.

WP CSS button
Add a slick-looking Web 2.0 call to action button with shortcodes.

Plugin of the Week: Search and Replace

We ran across an interesting problem when we transferred a WordPress site from Dreamhost to Bluehost. We actually did a database export/import with phpMyAdmin instead of using the XML export tool built into WordPress.

When the database was transferred over to the new site, something had converted or rendered the apostrophe characters (‘) in the site to a weird character string: â€™

So we had this seemingly weird string appearing on different posts and pages.

So how could you fix this? One way would be to give the aptly named “Search and Replace” plugin a whirl. It worked really well for our site considering it replaced over 400 character errors – which would have taken a really long time to fix manually.

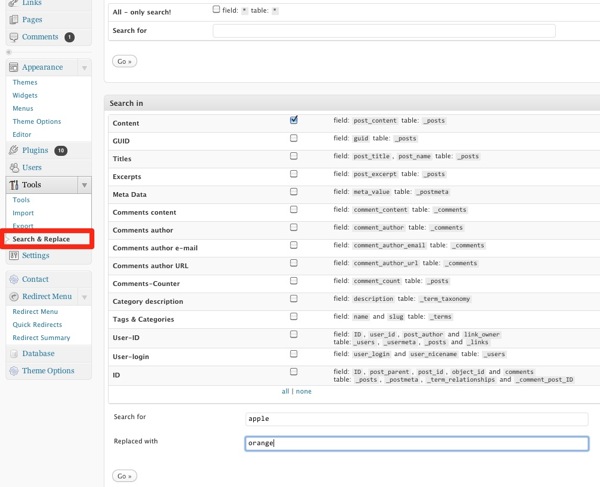
Once the Search and Replace plugin is installed and activated, you’ll find it under the Tools menu. Select the database field where you want to perform the search and replace. Most of the time this would be “content.” Make sure to scroll to the bottom of the page to use the search + replace function.

Search replace plugin

Make sure you have a backup of your the original MySQL file just in case you need to restore it because there isn’t an undo function. Again, there is no undo so be careful using this plugin.

Here are five other common conversion errors that we also had to fix.

• = bullet point •

— = long dash/hyphen —

“ = start quote “

” = end quote ”

’ = apostrophe '

Get it: “Search and Replace” plugin

Side note: If you’re an advanced user and want to prevent this error from happening, here’s a solution at the MySQL level.

Quick Tip: Link up up a post to page

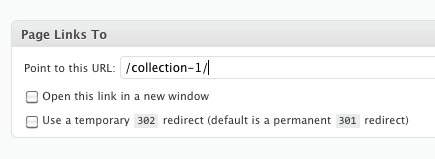
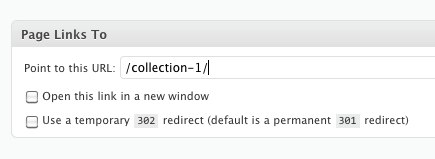
Here’s a quick tip for the day you want to point one of your WordPress blog posts link up to a static page. There’s a plugin for that and it’s aptly called “Page Links To” by Mark Jaquith. We’ve been using it for over a year now and it works like a charm. We think it’s one of those over-looked WordPress plugin gems that people forget about it but it’s become an indispensible tool in our arsenal.

Page links to

If you haven’t had the need to do this yet, you might ask why would anyone want to do that?

Here’s example one, if you had a contest page (like our MarsEdit tweet contest page) and wanted to maintain an easy to remember permalink URL as a static page. That way you could have an entry (headline) show up in your blog (or news) section but the target link would be a static page URL (www.yoursite.com/contest/) versus a blog URL which would be a longer URL.

Another use for it would be if your WordPress theme had a photo gallery slider on the home page that was setup only to link to blog postings and not static pages. You could use this plugin to link up the blog postings to pages versus hacking the theme.

Get it: Page Links To

Quick Tip: changing old permalinks to new format while keeping the old URLs working

Let’s look at two plugins to help when your WordPress site URLs “go bad.”

One of the things that people sometimes forget or neglect to change in a new WordPress settings is the permalink settings. Using the permalinks settings you can generate search engine friendly URLs.  The default WordPress setting is a little obscure with post and page ID tag numbers. Despite what the name says, permalinks aren’t so permanent if you decide to switch URL settings, you’ll get in trouble with missing page errors.

So if you’ve already published a lot of posts with the default settings, and have decided to switch to a more search engine friendly format, check out Dean’s Permalink Migration plugin to help the old URLs keep working while using a more SEO friendly URL structure.

Here’s also another plugin called Redirection that will “manage 301 redirections, keep track of 404 errors, and generally tidy up any loose ends your site may have.” Sounds good right? Well on one of our WordPress sites, it caused the home page to be “permanently” mapped to a page called “home” page even after we turned it off in Settings -> Reading. The solution? Either de-activate the plugin or read this workaround at WP Optimization so you can keep plugin active for other things.

Bonus: A way to avoid having broken links during any future permalink change is to install something like le petite URL, and always publish links using that plugin’s abbreviated (shortened) links, that way you links should work regardless of permalink settings.

Take “posts” to the next level with four WordPress plugins

One of the most confusing things for new WordPress users is understanding the difference between posts and pages. We won’t attempt to re-hash this subject as there are plenty of good references but here’s our take to tee up the purpose of this article.

We like to think of “posts” as a chronological stream of content a.k.a. a blog. You could also think of posts as “chunks” of content and you could relate or “tie” them together when you use the taxonomy features of WordPress by selecting categories, tags, and now “post types” in WordPress v3.1 for posts that you create.

We would then define “pages” as a way to have a static web page of content, for example an “About” or “Contact” pages. Pages are usually not updated as often as a posts. Technically, behind the scenes in WordPress there’s very little difference between posts and pages.

Finding flexible ways to show posts
So what if you want to have a “page” on the navigation bar to pull in blog posts within a certain category or tag? You could build a new page template by editing and creating some PHP but that’s a headache when you could use WordPress plugins to the same thing, right?

We found three indispensable plugins that will make your life easier if you want to create “pages” by pulling in and controlling content from your posts.

A real life scenario
Here’s an example, say you wanted to create a WordPress site with job listings. You could enter in the various open job positions into the posts editor and add tags and/or categorize them. Then you could setup pages on the navigation bar with labels like “mobile” or “PHP”. Then you could use a plugin that would pull in only job posts matching that taxonomy.

Both of these plugins, once you activate them, all you have to do is create your new page and then paste in the shortcode with some parameters like the ID number of the category or tags. We haven’t tried using them both at the same time but they definitely work on their own on some of our real life sites.

So the first plugin is called Posts by Tags for use when you want to create a page filled with posts from tags. All you do simply is paste in shortcode like this into your page editor:

[posts-by-tag tags = "tag1, tag2"][/posts-by-tag]

Simply replace 1 (and 2) with your tag ID number(s) to have that page show only posts matching those tags. We’ve noticed on certain templates you don’t have to put in the ending tag because it will show up on the published site.

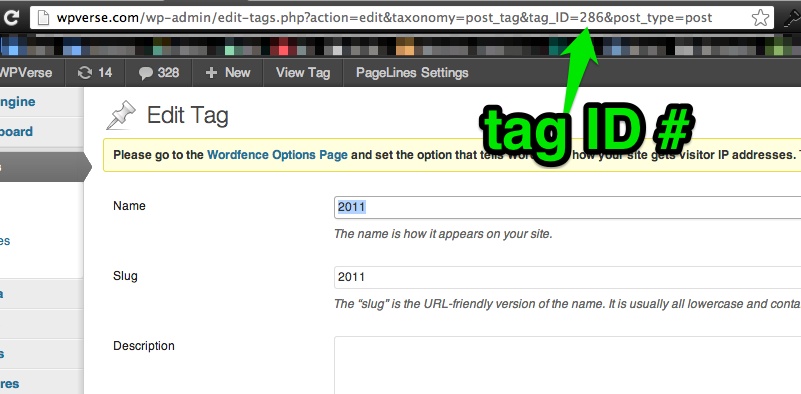
On a side note, so how do you know what your tag ID numbers are? When you’re editing the tags in WordPress admin, look for the ID number in the URL string at the top of the page like in the screenshot:
tag-id

And yes, there is also an plugin to show your ID numbers (newer more recently) updated plugin to show that info in the WP admin pages showing all your pages, posts, tags, categories, etc.

Publishing posts by Categories
So what if you want to show posts based on categories instead of tags? Give List Category Posts a try. This one was recently updated so it works with WordPress 3.1. It works in a similar way to the tag plugin but lets you use category names as well as ID numbers. In fact List Category will also support tags so if you’re looking for an all-in-one solution, give this one a try first.

The other way to publish “pages” of posts
Yes, there is another way to reproduce this type of site structure by simply using WordPress 3x’s navigation bar menu builder to create URL based queries for the tags or categories (example: /category/name-of-cateogry/). However using this method, you wouldn’t have the ability to add (type out) content around the posts either at the top or the bottom of the page.

Hide posts without a need for password
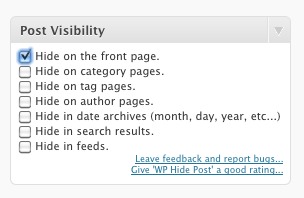
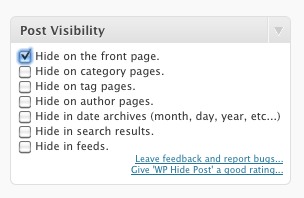
And the final plugin that you’ll want to try out is WP Hide Posts. This one might be helpful even if you don’t need to pull in posts into pages. With WP Hide Posts, you can hide certain posts from appearing on the home page or other post pages.

It’s useful if you want to write a “test” post that you didn’t want the general public to see yet on the home page. For example you had an announcement that you were working on with a copy writer but didn’t want to give them access to WordPress admin but wanted them to look at it first without the public seeing it.
Wp hide posts

Think of it as a way to have a “quasi-hidden” posts category that doesn’t require a password for anyone to see that posts. You can email people the URL of that post without a password required. We’ve used WP Hide Posts on our P2 reloaded site to hide posts related to revision history that don’t need to appear on the home page.

Note that users may still be able to find your post if they are using a tag/category cloud widget, so that’s what we mean by “quasi-hidden” so if it’s something top secret, password protect it.

So we’ve talked a bit about four very powerful posts tools for WordPress that will let you expand the way you think posts normally work in WordPress. You can use these tools to write, organize, and publish information in WordPress that you normally wouldn’t think of.

Get it: Posts by Tags | Show IDs | List Category Posts | WP Hide Posts
Quick Tip: Show all your (blogroll) links on any page or post

The Links library (sometimes called the blogroll) is an often overlooked feature of WordPress but it can become a powerful ally if you have want to setup a resources “library” of outgoing links to other websites. Of course there’s the blogroll widget that will let you display these links on the sidebar. But how do you get these links into a page or post?

Here’s a super no brainer way to get all your links (a.k.a. Blogroll) created in WP admin to show up on any page or post by pasting in a simple shortcode into the editor. It’s aptly called Links Page and it works well so far. We’re using it for our new WordPress/LAMP jobs site…

Update: we also found another plugin called WP Render Blogroll Links. This one gives a little bit more flexibility that it allows you to specify which categories or turn off category headings.

Both of these plugins seem to work fine with WordPress 3.1.

Plugin of the Week: Exclude Pages

One of my favorite things about WordPress 3 is the new navigation bar menu system. In the pre version 3 days, creating a navigation bar was kind of a pain in the butt. Now with WP 3’s menu system you can easily build a navigation in compatible themes.

But what if you’re using a theme that’s not WP menu friendly and you want to hide or remove certain pages from appearing on the navigation bar? That’s where “Exclude Pages” comes into play. It’s a really easy to use WordPress plugin, that puts a module called “Exclude Pages” right in your page admin below the page ordering where you can specify if that page should not appear on the list of pages. It’s a quick and painless way to hide pages from appearing on the navigation bar. Get it: “Exclude Pages