Sharedaddy adds Linkedin

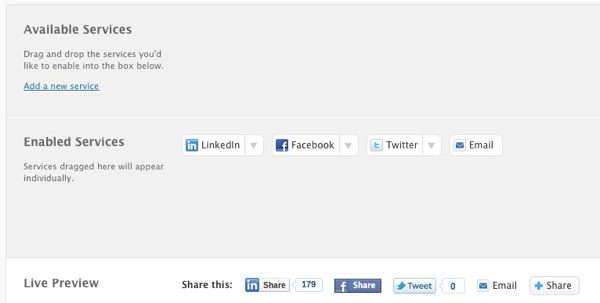
If you haven’t updated your Sharedaddy WordPress plugin recently, it might a good time to do so because they’ve just added Linkedin as another sharing service. It’s quite useful if you’re running a business or professional related blog or site. Note that as far as we can tell, the Jetpack version of Shareaddy hasn’t been updated with the Linkedin share button yet. Once you’ve gotten the latest copy of Sharedaddy, add Linkedin by going to Settings -> Sharing and drag down the Linkedin sharing button down to “Enabled Services.”

Sharedaddy linkedin

And make sure to click on “Save Changes,”

If you haven’t chosen a social sharing plugin, give Sharedaddy a try.

Get it: Sharedaddy plugin


How to bulk edit post attributes/settings

Here are three tips and tricks in case you ever need to edit the attributes for a ton of posts or pages and avoid sitting there for hours manually adjusting each post.

Tip one answers the question: How do I bulk edit the attributes for a bunch of posts?

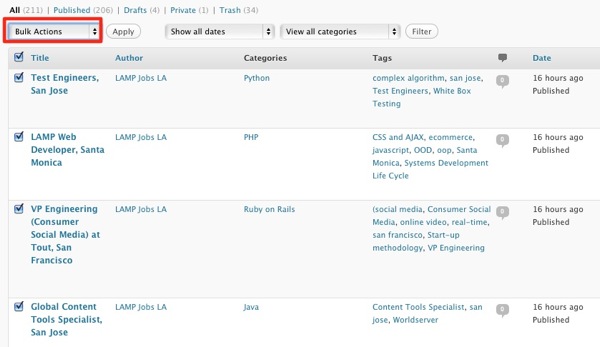
For example if you wanted to close the discussion/comments for a bunch of posts without having to manually edit or even quick edit each post? Here’s how. When you’re in the WP admin posts listing page, click on the checkbox on the top far left column (next to Title) to have the system select all posts on the screen. Or click on the checkbox for which ever posts you want changed. Next click on the “Bulk Actions” drop down right above the select all checkbox.

Wordpress posts bulk select

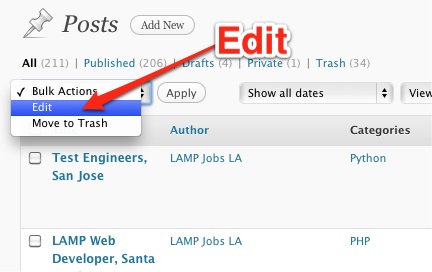
One of the drop down items under “Bulk Actions” is “Edit”. Click “Edit” and then “Apply” button.

Wordpress posts bulk edit3

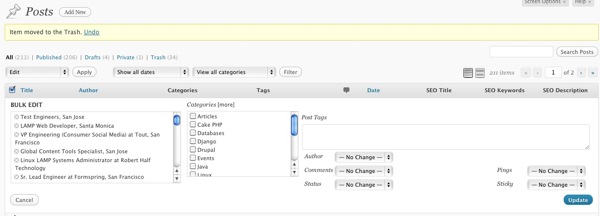
Then you’ll then see a screen like this:

Wordpress posts bulk edit2

Here you can apply a set of the same category(s), change the author, set comment/discussion status to the all the posts you’ve selected. Remember, once you click on “Update” – there’s no undo for your actions. So while its powerful tool, it can also be dangerous.

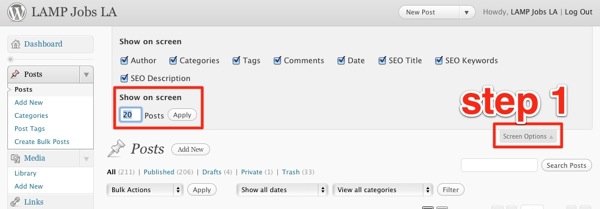
Tip two is: What if I have a 100 posts and don’t want to click-through 5 pages of posts? Did you know that you can define how many posts will show up per post listing page? WordPress normally shows 20 posts per page but you can set it up to 200. Once you’re in the posts listing page, click on “Screen Options” near the top right and you’ll see the “Show on-screen” field magically appear. Don’t forget to click on “Apply.”

Wordpress posts on screen limit

So both tips one and two could help an admin who needs to bulk edit the attributes for 100s of posts and wants to avoid having to browse through multiple pages of posts. Simply set the “show on-screen” field to “200”, click apply, and then bulk edit all the posts.

Tip 3 is for more advanced WordPress designers. Have you ever needed to know what ID numbers are your posts, categories, tags, links, and media without having to decipher the hyperlink in the status bar? Give “WP Show IDs” a try. It will add a new column to all your admin listings that show IDs on the far right column. It works great in conjunction with plugins that use shortcodes and require IDs like List Category Posts (which displays select blog posts on defined pages).

Try it: Twenty Eleven beta theme

We’ve had some readers ask us if the new Twenty Eleven (the successor to the Twenty Ten) theme will work with older versions of WordPress 3.x and after doing some light testing, we’re happy to report that it does indeed seem to be fine.

So we extracted the theme from the WP 3.2 3.3 beta and below is a link to a recent copy of the Twenty Eleven theme that should work with WordPress 3.1.x. As always when using beta software, we recommend installing the theme on a “sandbox” or test site and not on your live or mission critical site.

Download: Twenty Eleven beta theme

Update: WordPress 3.2 is out so we recommend that you update your older version and get the newest 2011 theme as a part of the package. Just go to your WP admin dashboard and click on the 3.2 update notification at the top of the page.

My favorite plugins of 2011 (so far)

A lot of people ask me what are my favorite WordPress plugins. So here they are in alphabetical order as of June.

I’ve covered a lot of these plugins already but I might omitted a few of them and some of them are new ones I’ve discovered from fellow WordPress designers and developers (like Natalie MacLees of the SoCal WordPress meetup group). All of these are available through the WordPress.org repository so they should be malware free and well-tested. And the beautiful thing is that I have most of the 20+ plugins all running here on WPVerse without any conflicts as far as I can tell.

Click on the Plugin name to go to the WordPress.org plugin page.

After the Deadline (also available as part of Jetpack)
Replaces the built-in spell checker with better spell and grammar checker.

Autoptimize
Speed up your WordPress site easily through HTML/CSS and Javascript optimization.

Bad Behavior
Reduce Spam comments from your site

Contact Form 7
One of the easiest ways to set up a quick contact form.

Enable Media Replace
Overwrite existing media library images without deleting them first.

Hikari Category Permalink
Gives you more control over the way posts appear in the URL using categories.

Google Analyticator
Great way to add Goole Analytics track coding and show summary report on your admin dashboard

Google XML Sitemaps
Works in conjunction with SEO plugins to help search engines crawl your site more accurately.

Import Blogroll with Categories
Lets you import links (blogroll) with categories intact

la petite url
Great URL shortner using your own domain

NextGen Gallery
A grand daddy of WordPress plugins that allows you to quickly build WordPress thumbnails and picture galleries. There are tons of add-on plugins to extend it even further.

Page Links To
Redirect pages or post to other URLs.

Relevanssi
Enhances WordPress’ built in search function to make it easy for visitors to find content.

Search and Replace
Just wrote about this powerful (and dangerous) tool a few days ago to let you search/replace the WordPress database tables.

Sharedaddy (also available as part of Jetpack)
Allows your visitors to share pages and post with a few clicks. Initial setup could be a lot easier but still a good plugin.

Simple Lightbox
Easily replace full size image links to lightbox viewer.

Twitter Goodies Widget
Nice looking Twitter widget to show your tweets on your sidebar with customizable color schemes.

Widgets Reloaded
Replaces some of the built-in widgets that come with WordPress including a better version of archives, authors, bookmarks (blogroll), calendar, categories, navigation, pages, search, and tags. Some of the widgets like bookmarks are extensive upgrades while others like calendar aren’t as complex.

WP Super Cache
The “That was easy” way to speed up your WordPress site. Can work in conjunction with Autoptimize.

WP CSS button
Add a slick-looking Web 2.0 call to action button with shortcodes.
Using Pagelines Platform Pro and Jetpack together

We took a look at the free version of Platform Pro a few months ago and were impressed with the features and customization options enough so that we bought it. So we recently built a traditional blog for a client with the commercial version of Platform Pro.  We also looked at Jetpack plugin when it first came out a few weeks ago but were turned off by some bugs typically found in a version 1.0 product. Pagelines  So we decided to take a second look at both Platform Pro and Jetpack at the same time. These are not meant to be full reviews but provide some key insights in a short amount of space.

Platform Pro
During the process of customizing our client site we were reminded of how powerful Platform Pro can be but there are a ton of options to look through. One of the most powerful features allows users to select what kind of modules show up on each type of page (home, blog, individual posts, etc.).

For us, this process became be downright confusing when we had to figure out which page type we were modifying. We had to keep refreshing the published page to see which page type we were editing at the moment. It’d be great if there was a preview or explanation of which page type was being currently edited.

We also wish there was a simple footer module that could be used instead of 3 or 5 column design that forces the user to show extra content when it may not be needed or desired.

Also as we mentioned in our previous review, some similar options are saved into two different pages. For example the social network features of the theme appear in three separate pages: global options (footer Twitter feed), Template Setup (post/page sharing buttons), and Header and Nav (Social Network profile URLs). Our suggestion would be to perhaps keep these fields on their current pages but also add a new page that has all the social media features on one page.

Platform Pro when it was first released was great for its time but the complexity of the theme panel is starting wear us down even after we’ve used it on several sites. Call us hypercritical but if we’re confused, imagine what a new WordPress user could feel like. We hope the next major revision of Platform Pro improves the grouping of menus/options and provides a more intuitive way to build page types.

Jetpack
When we were first tried Jetpack, we didn’t try the bundled Twitter widget so this was a good time for us to try it out.

Some people once seeing it on their site may be disappointed that there’s not much options for color styling. The Twitter Widget looks very plain and boring but heck it works without very little effort or configuration. We’re using the standalone version of the widget, here on our site on our sidebar, so you can see it’s very plain-jane.

If you want something that’s slicker and customizable with colors, we’d recommend the Twitter Goodies Widget by NetWebLogic. It’s a bit more effort to customize the color but it maybe worth the effort to some.

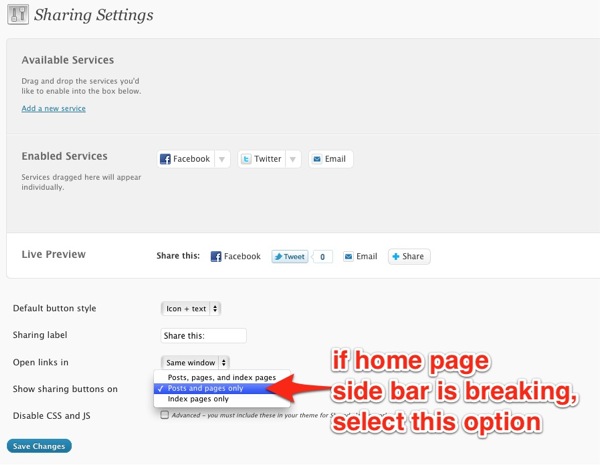
Here’s a tip for Jetpack (and Sharedaddy stand-alone) plugin users who are using Platform Pro. If you enable Shareadaddy to show sharing buttons on the home page, your sidebar widgets may wrap to the bottom of the page into the footer area. And it currently doesn’t show the share buttons on the home page anyways so selecting it doesn’t work in the first place. To fix the sidebar from appearing in the footer, you need to set the display to show only “Posts and pages only.” See the screenshot below.

Wordpress jetpack sharedaddy index

Get it: Platform Pro theme / Jetpack plugin

Free StackOverflow-like theme: CivicStack

In the next few weeks, we’ll be releasing innovative WordPress themes for free to the public. We want our themes to be unique and provide features not found anywhere else.

So we’re very proud to release a beta version of our new CivicStack theme. This theme allows you to create a WordPress site that will allow your visitor to quickly and easily engage in conversations through two types of voting processes without the need to create a user account.

The first type of voting is based on a five-star system for the posts. The second type of voting allows you to vote on comments made by users. Visitors can vote up or down comments similar to the StackOverflow site. There’s also a user leaderboard page that shows you the top commenters based on votes that they have received.

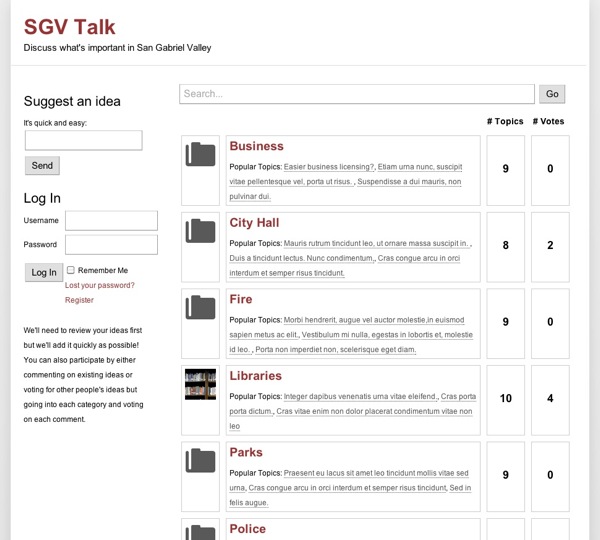
The system defaults to a home page listing all the categories similar to a message board format. This home page is dynamically generated as you add new posts and categories. The stacking order of the categories can be set through the theme options panel.

Civicstack theme home

You can upload also thumbnail for each category through the theme panel. The theme lists the posts with the most votes as “popular topics.”

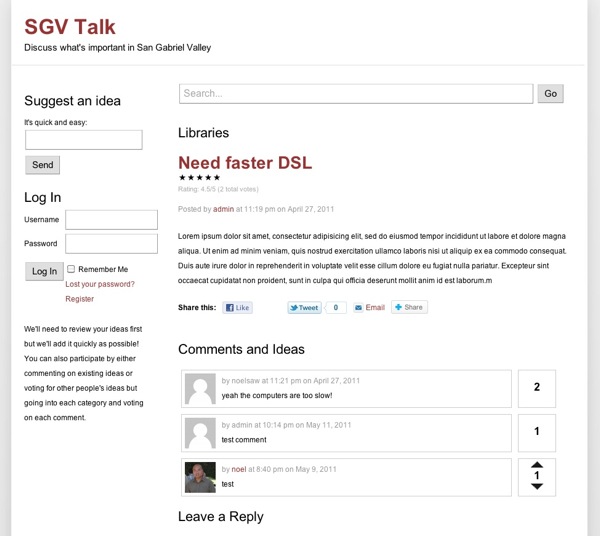
When a visitor drills down to a post page from the home page, they’ll see something similar to this:

Civicstack theme voting

Visitors can only vote up or down a comment once. The gravatars are shown from Gravatar.com once a user has registered for an account. We also suggest using the Mingle Plugin that will allow other users to look at other user’s profiles.

You can also activate a widget that allows visitors to suggest a post by dragging over the widget called “Suggest an Idea” to the left sidebar. This will visitors to suggest an idea. Currently it saves the “idea” as a post in draft mode. So it’s up to you to edit, categorize, and publish each suggested post as needed.

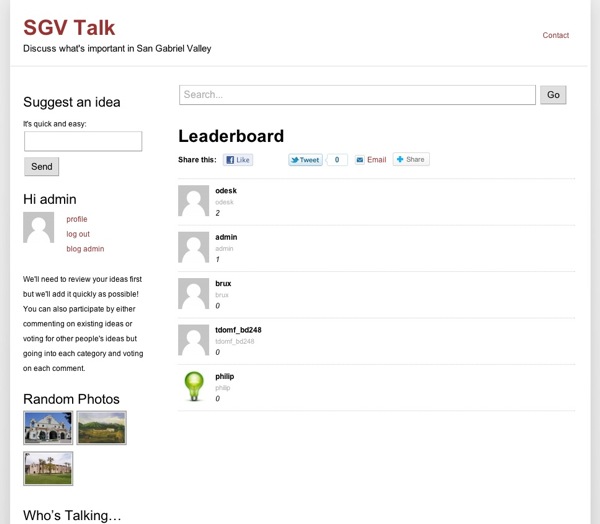
To create a user leaderboard page, create a new page called “leaderboard” and then go under page templates to select “user leaderboard.” On the public side, it will display a page like this:

Civicstack theme leaderboard

Home page options
You can also specify a blog type home page in the theme panel that will show a list of blog entries. The option exists in the theme panel. See a demo of the blog home page version…

To create an “inner” category listing page, simply create a new page and choose the “Category List” under page attributes/templates module. Then link up that page on the navigation menu to show the category list.

Extending functionality with plugins
So far we’ve successfully used our theme with the following plugins: NextGen gallery (photo gallery), Smooth Gallery for NextGen, Sharedaddy (social media sharing), Google Analyticator (track visitors), and Mingle (social user profiles).

Download Stable: CivicStack 1.4b
Download Beta: civicstack-1.5a

New version of OnSwipe coming late June

A few months ago we took a quick look at the brain dead easy way to publish an iPad friendly version of your WordPress site using OnSwipe. We were told by CEO Jason Baptiste that they were going to launch with a new version a few weeks ago but for whatever reason it didn’t materialize.

A few minutes ago, we just got word that Jason and his team are ready to launch a new version of OnSwipe for all popular CMS including WordPress, Drupal, Joomla, and Tumblr later this month on June 23rd. Watching the video below, we’re guessing they’ll be now supporting smaller mobile devices like iPhones and Android phones and that they’ll be offer content hosting as well.

Onswipe Demo Video from Onswipe on Vimeo.

We look forward to seeing what OnSwipe has in store for us – check back here at the end of June!

Quick Impressions of WordPress 3.2 beta

WordPress 3.2 is coming soon – sometime in late June. So here are some of our thoughts and preview of it in no particular order on the latest beta version. By no means is it meant to be an in-depth review – for a more thorough look at 3.2 beta, check out WPMod’s review. Note that things may change between now and the final 3.2 release.

Once you login to WP admin, you’ll see there’s a whole new look to the whole admin system. Our “nitpicky” take is that the some of the proportions aren’t as well thought as the current 3.1x releases. By proportions we mean the sizing of certain text and images relative to each other.

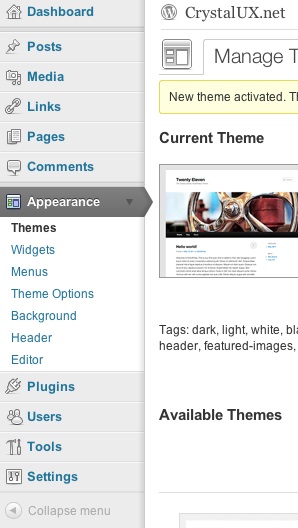
Wordpress 3 2beta menu The new admin vertical navigation bar now uses less space so more usable area is saved for the rest of the page but upon first impression it’s not as pretty as the current release. On the functional side it does show which module you happen to be in much more clearly with a right pointing arrow.


The other big change is the full screen post/page editor now has “distraction-free” writing with a minimal set of toolbar icons. The toolbar will also fade away once you start writing something. It’s very “zen-like” and great way to focus on creating content.

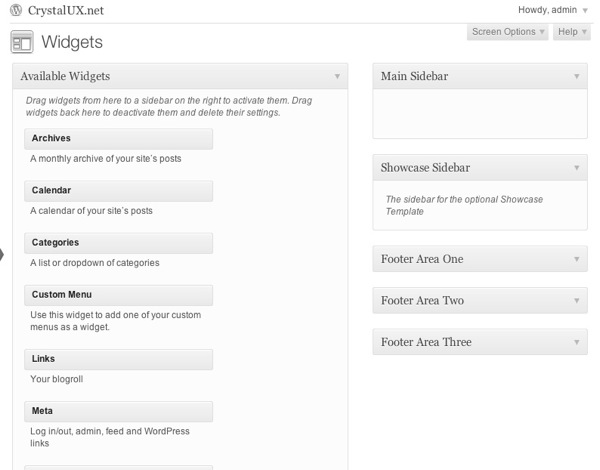
As for the new Twenty Eleven theme itself, we think it’s a great evolution for the default theme. There are a ton of widget areas which should make content areas really easy to populate. Wordpress 3 2beta widgets

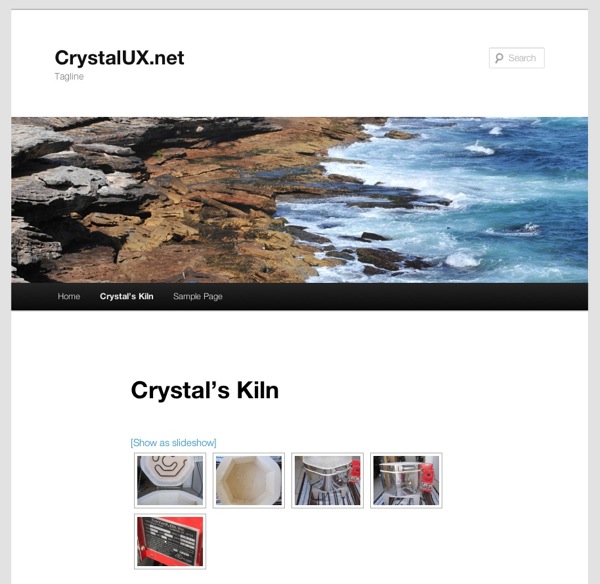
One of our main concerns was that it seems to have a lot of vertical spacing between the navigation bar and page title.

Wordpress 3 2beta page title

We also ran very quick tests with the NextGen gallery, Enable Media Replace, and Autoptimize plugins, all which seemed to work without a hitch. We ran these plugins through their paces by creating a gallery, overwriting an image, and seeing if the CSS/HTML were optimized. Basically these plugins seemed to work and didn’t crash the site. It’s not an extensive test but we were able to see the basic functionality was in good shape.

So that ends our quick look at WordPress 3.2 beta. Stay tuned for more in the upcoming weeks.

In-depth preview of 2011 WordPress theme

Our friend Kevin at WPMods has written a great review of the new Twenty Eleven WordPress theme that’s included with WordPress 3.2 beta. It’s not a giant leap forward but it has some nice features that would have been normally been reserved for “premium” commercial themes a year ago.

If you’re interested in trying out 3.2 and Twenty Eleven theme, you can download it here at the release archive at WordPress.org. Scroll about 85% of the page down to find “3.2 beta” versions.

After downloading the ZIP file, you can then upload the extracted files via FTP to your WordPress hosting directory and as always, make backups of everything first. Also never update a live or critical site with a beta release. And did we mention, back everything up first and do this at your own risk?

Update: we were inspired by Kevin’s article enough to take a look at WP 3.2 and Twenty Eleven for ourselves and write a quick review about it.


Plugin Tip: Google Analyticator

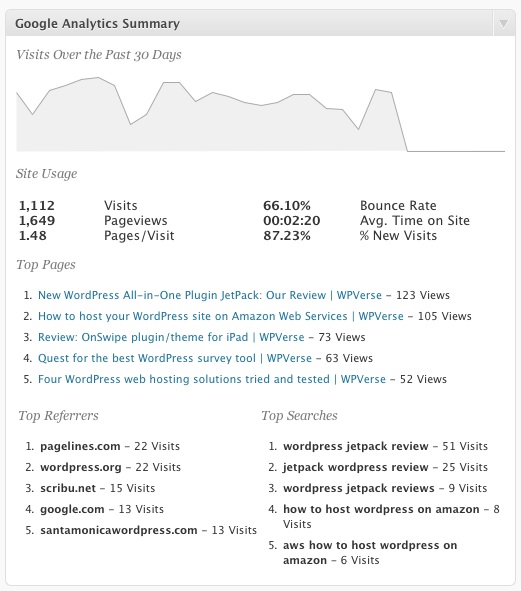
One of our “must have” plugins is Google Analyticator by Ronald Heft. It will let you track the traffic on your WordPress site using Google Analytics. The best part is that it will give you an admin dashboard widget that shows how much traffic your site is getting every time you login to WP admin (see below).

Google accounts analytics

But recently we ran across some problems with Google Analyticator after we moved our site from MediaTemple to MDD hosting. For whatever reason simply pasting in the Google analytics ID number didn’t work. Google Analytics wasn’t receiving any of the tracking information, so we had to go for the alternative option to authenticate the plugin (and site) with Google.

However, when we tried to authenticate the plugin with Google, we got an ambiguous error message from Google’s site:

The site “http://example.com” has not been registered

Unfortunately the error message from Google is quite cryptic and has no solution attached to it.

So how to fix this? It’s relatively easy: go to Google’s domain management site and register your domain.

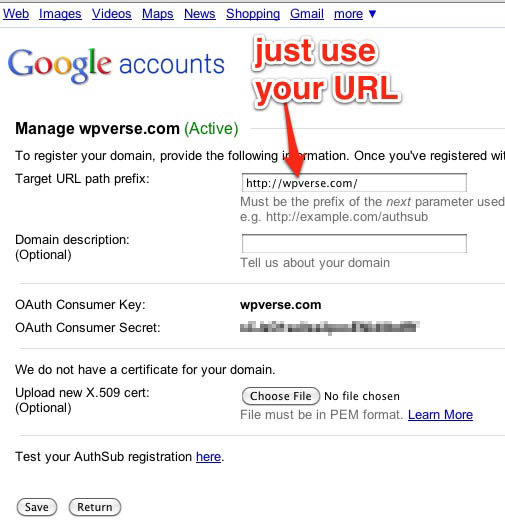
The tricky part is on the second page of the signup process where it will ask you the “Target URL path prefix.” Simply type in your domain. You don’t need anything else unless your WordPress site exists in a folder – for example: /blog/ or /wp/ .

But for most people, just type the root URL, example:

Google accounts analytics register

We found it strange that we never had to do this before considering that setting up a Google analytics account should (in a perfect world) automatically create a domain account but we can’t complain since Google Analytics is a free product.

More background information about this particular issue and other trouble shooting tips at Ronald’s support forum…