Comprehensive set of free CMS plugins

WNET a PBS station in New York uses WordPress to power their website. Now in conjunction with their developers, Tierra Innovation, they’re giving back to the WordPress community a set of unique WordPress plugins that extend its CMS functionality. Here’s a quick summary of the available plugins:

Ajax Report Comments allows users to report inappropriate comments to the administrators.

Audio Playlist manager extends the MP3 play capability of the built-in media gallery.

Billboard Manager is a JQuery-like slider or gallery. You can give it images or videos to cycle through along with unique hyperlinks for each one.

Extend KSES allows your WordPress editor to accept currently disallowed HTML tags like embed or iframe.

Facebook iLike allows your users to like your pages within your WordPress site along with customization options.

Smart Category Ordering allows you to resort your categories at both the parent and children level. This is useful if your theme automatically shows themes on a sub-navigation bar.

WPDB Profiling lets you profile your SQL database. It’s useful to track down errant plugins that might be slowing down your website.

Get it all: Tierra Innovation

Quest for the best WordPress survey tool

We wanted to title this post “Survey of the WordPress surveys” but thought we were being too smart for our own good Let’s proceed!

As many of you know, we’re currently running a survey based contest to gauge the state of themes for the WordPress community. Here’s a quick break down of our experiences so far with four survey tools.

Polldaddy
It’s a survey/poll company owned by Automattic. The site is a standalone web application like Survey Monkey so you can use it on virtually any website. Since the service is owned by Automattic, you’d think it would play nice with WordPress self hosted site. Yes and no, unfortunately right now the WordPress plugin would only see polls not surveys that were created in the web site. So we were stuck  using an iframe embed tag. A drawback to this method is there is no way to set the width of the content in the iframe so there are ugly scroll bars on the post. Update: we were given instructions on customizing the width and style of surveys by the friendly support folks at Automattic and found a “how-to” tutorial as well.

On the authoring front, Polldaddy is the slickest tool out there similar to Wufoo forms with a lot of Ajax drag and drop features. Results get saved into a database and you can receive notifications via email. There are also data filters available to help you create reports.

But since a free account at Polldaddy was limited to 10 questions and 100 surveys, we decided to give some 3rd party plugins a try.

WP Survey And Quiz Tool
This one seemed a little buggy with WP 3.0.5. We saved some questions and when we returned back it, it had disappeared. Setting up contact/user ID questions are separate from setting up the questions so there was a little bit of a disconnect for us. We gave up on this one for now.

WordPress Simple Survey

The name almost belies actual usability. This one has the most minimal GUI to setup questions and answers. They need to be setup in text boxes. It has scoring formula to keep track of answers. Could be very powerful if you’re willing to invest the time into it. But it was a little too much for us.

Survey Me

After Polldaddy, we were thought this one had the most potential.

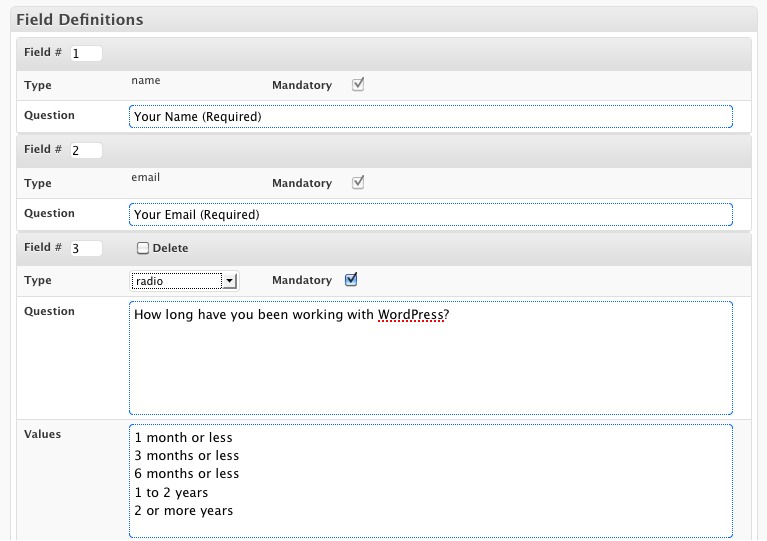
The authoring portion is not slick without drag and drop features but it saves you a few steps by adding contact fields at the top of all new surveys. For new survey it starts you with 10 questions. You have your choice of check boxes, text, long text, radio buttons, and even a recapthcha module.

To add  a new field or resorting the order, you have to type in the new questions or type a new sort number to the new field module and then save the form for the changes to take effect. To sort the order, you have to type in a number into each module. We were excited to use this plugin but it currently doesn’t save results right now within our WP 3.0.5 setup. Update: the developer let us know that a space in the form name was preventing the save. We will give it another try.

In the end, even with the aesthetic problems with using an iframe embed, we decided to stick with Polldaddy until we find something better. But if you’re looking for commercial support and more comprehensive data reporting, Polldaddy maybe the best option for now. Update: since the nice support person at Automattic helped us out even with a free account so we’ll be sticking with Polldaddy for awhile.

Get it: Polldaddy | WP Survey And Quiz ToolWordPress Simple SurveySurvey Me

Quick Tip: Add a smooth call to action button anywhere

Here’s a time saver, if you want to add a nice looking “call to action” (CTA) button like “Signup” or “Download” to your site. Normally that would require a lot of steps: design it in Photoshop, upload a graphic into the media library, and then insert it into your post. And then link it up. Wow, that’s a lot of steps and time.

Well there’s a WordPress plugin to speed that process up a lot – try WP CSS Button plugin and use their short code almost anywhere on the site to display a button like this:
[CSSBUTTON target=”http://startupsinsider.net” color=”FF8A00″ textcolor=”ffffff”]Signup[/CSSBUTTON]
Once the plugin is installed and activated, you simply insert this shortcode in your post editor:

[CSSBUTTON target="http://startupsinsider.net" color="FF8A00" textcolor="ffffff"]Signup[/CSSBUTTON]

You can also replace the hex button text/background color and hyperlink with anything you’d like. And here’s a tip from us, if your site shows an underlining effect on the left/right side, insert this code to the bottom of your theme’s CSS file to hide it.
.button_col a { border-bottom: none; }

Once you make the 2-3 min. investment in time, adding nice looking buttons could take just seconds!

Get it: WP CSS Button plugin

Creating tabbed content

If you need to have a ton of content to be presented on single page it can be challenging so the reader doesn’t become overwhelmed. Dividing your content into a tabbed module is one possible solution It’s especially helpful if one section of content is going to be really long (tall) and the user may want to jump ahead to a different section. One way to do that would be by putting the content into tabs on a single page.

Some possible use cases are for product reviews which could be broken up into: intro, review, and conclusion. Here’s a quick example – click on tabs!

{tab=Intro}
The product was designed by ACME in 2010. Steve Ive and Johnny Jobs collaborated on this brilliant design.
{tab=Review}
Lorem ipsum dolor sit amet, consectetur adipisicing elit, sed do eiusmod tempor incididunt ut labore et dolore magna aliqua. Ut enim ad minim veniam, quis nostrud exercitation ullamco laboris nisi ut aliquip ex ea commodo consequat. Duis aute irure dolor in reprehenderit in voluptate velit esse cillum dolore eu fugiat nulla pariatur. Excepteur sint occaecat cupidatat non proident, sunt in culpa qui officia deserunt mollit anim id est laborum.
{tab=Conclusion}
It’s a great product! Buy it today
{/tabs}

So how do you do this with WordPress? We ran across this plugin called “WordPress Tabs Slides” and it works brilliantly. It’s Ajax driven so it’s almost instantaneous and the user doesn’t feel like they’re being taken onto another page. You use very simple shortcode to mark sections in your content within your post or page and you’re done.

Congrats and thanks to Abdul Ibad for coding a great plugin for the WordPress community.

Google to fight webspam and improve search engine results

One of the toughest challenges running a web site is to get traffic and attention to your site. As we keep emphasizing, relevant content is the way to get visitors to your site. But what if other people are cheating at using important keywords and sending visitors to low quality spam farm websites? You know the ones with that lead visitors on an endless click spree with pop up windows and signup prompts.

Once Google was the king of clean and relevant results but now these days, Google search results are filled with spam sites which are designed to trick the user into looking counterfeit goods or other nefarious activities. These sites trick Google into thinking they’re relevant with various methods. Fortunately, in a recent official blog posting, Google’s anti-spam team is responding and employing un-disclosed changes to turn back the tide to show relevant content, spam free websites.

So while Google is doing their job, you should keep writing relevant content for your website as much as possible. Use a combination of creating relevant content, Scribe wordpress plugin, and sending out Twitter tweets will drive traffic to your website. You can use tools like PixelPipe to speed things up but there is no substitution for hard work.

Further reading:
How Organized Spam is Taking Control of Google’s Search Results
This article has detailed examples and analysis of spam sites results as of January 2011.

Via: Google Changes Algorithm To Penalize Site Scrapers

Reprinted from StartupInsider.net

A few more thoughts on Mars Edit 3

I bought Mars Edit 3 a few weeks ago and wrote a quick review. So time for an update! Here are some things that I really think make it an indispensible tool.

My favorite is that it’s easy to use to cross post from one blog to another. Simply open an existing post to edit, then from the drop down menu select a new blog site and click on publish. You will loose the existing categories and need to re-define them (understandable) but the tags will stay in-tact.

I also realize this maybe a good offline back up tool for your content especially if you increase the number of posts for it to sync. Update: Just noticed the dialog box to increase the post limit has a performance warning. I’ve asked the developer for clarification.

So four things that I wish it would have are…

I wish Mars Edit had the ability to schedule posts to publish on a future date.
Update: I was informed by the developer that you can actually do this. First, open up the selected post to edit and once open, go to drop down menu for “Post”, select “Edit Date” to specify the future date to publish on. It’s too bad this feature is kind of hidden away and not part of the post editor window.

marsedit-edit-date.jpg

Secondly,  it’d be nice to be able to set line spacing aka leading in the editor. The default font is a bit too small for me but it can be increased but I don’t see a way to increase the leading.

Thirdly, I wish the keyboard shortcut to define a link was not so complicated, a simple Apple + l (for link) would be nice. And why not also allow a right click to assign a link?

And one last feature wish would be for a way to change the author attribution when editing a post.

Other than these relatively minor issues, I readily recommend Mars Edit for writing if you’re on the Mac.

Get it: Mars Edit 3

DIY SEO: Scribe Plugin & Service

What’s the best way to get traffic? It’s the old adage, lots of hard work. Simply build the best and most relevant content on your WordPress site. The second best bet is to use a search engine optimization (plugin) for WordPress that will help you fill out the required fields to get a search engine to properly crawl your site.

The third step is to get some advice and research on the best practices and what relevant keywords to use. Usually hiring an “expert” is going to easily cost you hundreds of dollars. So for many of us, we’d resort first to the Do It Yourself model.

So we were excited when we heard the team that brought us StudioPress and the Genesis theme framework recently introduced Scribe, which is a self-service Search Engine Optimization (SEO) web app with a complementary WordPress plugin.

We were also fans of Brain Gardners’ earlier commercial WordPress offerings (the predecessors to StudioPress), so we had high hopes for Scribe. Was this anticipation well deserved?

First the numbers, Scribe starts at $17/month and includes up to 15 evaluations and 35 keyword searches. According to Scribe, it takes about 3-5 evaluations per web page to fully optimize it. Evaluations are every time you scan a web page.

Let’s get started. After signing up with a credit card on ScribeSEO.com, they’ll assign you an API key. The installation process is fairly straight forward, you’ll install their suppplied plugin and paste that API key into a field.

Next you’ll have to have install one of the many WordPress SEO plugins. The one that we like so far is All in One SEO pack. Scribe will detect available SEO plugins and adjust its status indicators for each post depending on which SEO plugin you’re using.

When you open an existing post, you’ll see 3 check box status in the right side widget area: Title Tag Ready, Meta Descriptions, and Content Ready. Think of these as check list to help you figure out where the page stands in terms of search engine readiness.

There’s also a widget called Scribe Link Building which won’t show any data until you scan / analyze the page.

This review will be on going so we can’t really answer whether or not it works but so far we like what we see. The only drawback so far is that there’s really little hand holding once you’re signed up. I hate to say it but you’re kind of your own to figure this out as we didn’t see any “Getting Started” tutorial.

The Welcome email gets you up to installing the API key and a link to the support pages but there definitely needs to be a little bit more TLC for new users.

Stay tuned as we optimize real world sites. One test case will be this site and another will be a biotech services web site. Let’s see if Scribe becomes an indispensable SEO tool or not.

Get it: Scribe

Offline WP editor: Mars Edit

In the past, I’ve mentioned tools like Scribefire that work within your web browser to help you quickly post WordPress content. I’ve been using it for a while and I like it minus the occasional hiccups when it doesn’t clear the previous content and I accidentally overwrite an existing post. You could probably chalk some of that up to user error/impatience.

I always think there’s ten different ways to do something and sometimes it’s good to reduce the so-called “background noise” by just focus on the writing and not have all the crazy visual distractions of the web in front of you. Enter Mars Edit 3 by Red Sweater for the Mac, an elegant off-line blog editor that works with WordPress (of course) and other blog systems. You can use it to manage multiple blog sites on multiple platforms.

Mars Edit lets you create new posts and pages while having the ability to edit existing ones too. It gives you almost the same editing capabilities as WordPress’ built in editor including creating categories and tags. You can also upload pictures and media through the Mac interface.

One neat touch is that it will auto-detect URLs in your clipboard and automatically paste them in when you insert a link.

One interesting incident during my testing that may also throw off new users. I saved a draft of this post and thought it would be uploaded to my site as a draft but instead it saved this post locally as a draft file. Not a big deal, after I found the draft but for a few moments, it was a yikes moment. It would be nice if it gave you the option of uploading a draft since some users may choose to leave their computer at home and finish the rest of the post on say an iPad on the road.

I also wish it had better media management as currently local file pictures show up only in a thumbnail view. It does have a quick search feature to drill down by file name but it’s too bad it doesn’t have a list view sortable by date. It would also be nice if Mars Edit integrated with some of the WP picture lightbox plugins so when you add a picture, the image style gets incorporated automatically.

To be entirely fair, Mars Edit wasn’t designed to be just a WordPress editor but it also works with Tumblr, Squarespace, and other blogs. Overall, it’s a well designed product and I’ll be buying Mars Edit very soon. In the meanwhile, if you’re interested there’s a trial version you can download.

Get it: Mars Edit 3

Time Saver: use Pixelpipe to push to 100+ networks

How would you like to have the ability to push (simple) content into WordPress, Tumblr, TypePad, etc. with one click? Or how about sending out a status update to Facebook, Twitter, and Google Buzz with a single little click. Check out Pixelpipe.  It’s a free web app service where you can setup all your social network accounts and use one interface to write content and publish it to multiple networks.

One of my favorite features? The ability to send an update through your IM client, just open up an IM window and select their “bot” contact/buddy, then type your message and hit enter. Voilà, done!

Expect a slight delay (1-2 minutes) for your content to show up at each network but ultimately it saves a lot of time doing each one manually. Get it: Pixelpipe