Quick Tip: changing old permalinks to new format while keeping the old URLs working

Let’s look at two plugins to help when your WordPress site URLs “go bad.”

One of the things that people sometimes forget or neglect to change in a new WordPress settings is the permalink settings. Using the permalinks settings you can generate search engine friendly URLs.  The default WordPress setting is a little obscure with post and page ID tag numbers. Despite what the name says, permalinks aren’t so permanent if you decide to switch URL settings, you’ll get in trouble with missing page errors.

So if you’ve already published a lot of posts with the default settings, and have decided to switch to a more search engine friendly format, check out Dean’s Permalink Migration plugin to help the old URLs keep working while using a more SEO friendly URL structure.

Here’s also another plugin called Redirection that will “manage 301 redirections, keep track of 404 errors, and generally tidy up any loose ends your site may have.” Sounds good right? Well on one of our WordPress sites, it caused the home page to be “permanently” mapped to a page called “home” page even after we turned it off in Settings -> Reading. The solution? Either de-activate the plugin or read this workaround at WP Optimization so you can keep plugin active for other things.

Bonus: A way to avoid having broken links during any future permalink change is to install something like le petite URL, and always publish links using that plugin’s abbreviated (shortened) links, that way you links should work regardless of permalink settings.

Taxonomy Drill-Down plugin – Plugin of the Week

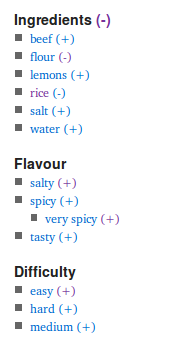
Multiple taxonomies screenshot 1Here’s an excellent WordPress plugin for sites that have a lot of categories and tags for posts. You can use Taxonomy Drill-Down to either a widget on the sidebar which displays a faceted search box. The widget shows plus and minus signs for categories/tags, allow your visitor to drill down to a filtered set of posts matching their criteria.

It even supports the Simple Taxonomies plugin (similar to post types) so you can do even more fancy things.

You can even use the plugin to insert code snippet directly into your theme template to show it anywhere on your WordPress site.

Based on our experiences, here are some tips: before you install this into a live WordPress site, install this into a test WP site where you have a recent copy of your content imported. Once you actually test out this plugin yourself, it will expose any deficiencies in the way you’ve set up categories and tags. In our case it showed we went a little overboard setting up categories on some of our sites. The plugin also automatically loads new matching posts on the fly so there’s a quick transition that jumps the user to a new page so the widget disappears below the fold making it somewhat jolting, so you may want to have this widget near the top of the page so the user doesn’t wonder what just happened when they use it.

You can use this Taxonomy Drill Down plugin in combination with an improved search plugin like Relevanssi to help your visitors find the content they’re looking for. After all, if you have a ton of useful content you should make it easy for people to find what they’re looking for.

Get it: Taxonomy Drill-Down plugin

New WordPress All-in-One Plugin JetPack: Our Review

Well, it’s only been about 8 hours since Automattic released an arsenal of all-in-one WordPress plugins called Jetpack. After trying them out for the past few hours, we’ve arrived at this conclusion: If you add these to existing live sites, you may run into some compatibility issues with existing plugins.

Example #1: On one of our sites running Platform Pro theme, the sidebar disappeared entirely. We had to delete the cache in WP Super Cache to get the sidebar back.

Example #2: We also had one site running the popular Sociable for WP 3.0 plugin, which seemed to cause problems with the ShareDaddy module (for obvious reasons) with the end result of missing icons. In the end, we turned off Jetpack on all our sites until we know things are ironed out.

Our Conclusion
It’s interesting that Matt & company have chosen to go the “shotgun” approach route to extending WordPress’ functionality right after the 3.1 release. Some of the plugins aren’t new to the community – for example “After the Deadline” has been around in stand-alone form for a while. We’re not surprised that when someone “mixes” (installs) a lot of new functionality into an existing WordPress installation, there are some hiccups, especially if you have other plugins running. I am sure the WordPress crew tested it as much as possible, but there’s nothing like code in the “wild,” as they say.

Update: If you’re using the Sharedaddy module either alone or with Jetpack, be sure to check our tips and tricks for it here…

Update 2: If you’re having problems activating Jetpack – getting an error message connecting with WordPress.com, check out a great debugging thread at WP.org which includes many fixes and workarounds.

Automattic releases JetPack plugins for self hosted WP sites

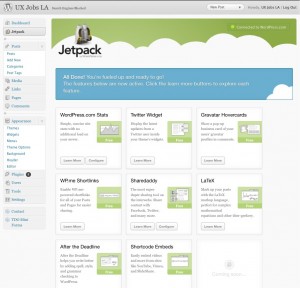
Automattic has just released a swiss army knife of plugins for WordPress self hosted sites called Jetpack. It includes traffic stats, a Twitter Widget, Gravatar Hovercards, URL shortener, social network sharing buttons, LaTeX for mathematicians/scientists, grammar/spell checker, and other shortcodes.

You’ll need to have or create a WordPress.com to activate it’s features. Here’s a screenshot once it’s installed, activated, and hooked up to WP.com. Click for larger size screenshots.

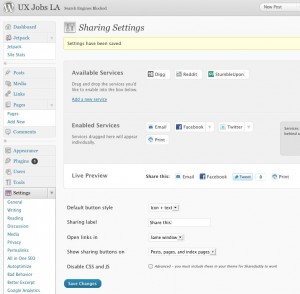
We activated the share feature on our UXJobsLA.com site…

…and it seems to have some hiccups with an older WordPress theme and possible conflicts with another plugin.

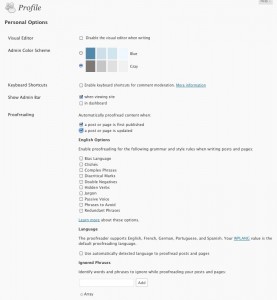
Below is the “After the Deadline” plugin settings for proof reading.

Stay tuned for a full review later today.

Get it: Jetpack

Take “posts” to the next level with four WordPress plugins

One of the most confusing things for new WordPress users is understanding the difference between posts and pages. We won’t attempt to re-hash this subject as there are plenty of good references but here’s our take to tee up the purpose of this article.

We like to think of “posts” as a chronological stream of content a.k.a. a blog. You could also think of posts as “chunks” of content and you could relate or “tie” them together when you use the taxonomy features of WordPress by selecting categories, tags, and now “post types” in WordPress v3.1 for posts that you create.

We would then define “pages” as a way to have a static web page of content, for example an “About” or “Contact” pages. Pages are usually not updated as often as a posts. Technically, behind the scenes in WordPress there’s very little difference between posts and pages.

Finding flexible ways to show posts
So what if you want to have a “page” on the navigation bar to pull in blog posts within a certain category or tag? You could build a new page template by editing and creating some PHP but that’s a headache when you could use WordPress plugins to the same thing, right?

We found three indispensable plugins that will make your life easier if you want to create “pages” by pulling in and controlling content from your posts.

A real life scenario
Here’s an example, say you wanted to create a WordPress site with job listings. You could enter in the various open job positions into the posts editor and add tags and/or categorize them. Then you could setup pages on the navigation bar with labels like “mobile” or “PHP”. Then you could use a plugin that would pull in only job posts matching that taxonomy.

Both of these plugins, once you activate them, all you have to do is create your new page and then paste in the shortcode with some parameters like the ID number of the category or tags. We haven’t tried using them both at the same time but they definitely work on their own on some of our real life sites.

So the first plugin is called Posts by Tags for use when you want to create a page filled with posts from tags. All you do simply is paste in shortcode like this into your page editor:

[posts-by-tag tags = "tag1, tag2"][/posts-by-tag]

Simply replace 1 (and 2) with your tag ID number(s) to have that page show only posts matching those tags. We’ve noticed on certain templates you don’t have to put in the ending tag because it will show up on the published site.

On a side note, so how do you know what your tag ID numbers are? When you’re editing the tags in WordPress admin, look for the ID number in the URL string at the top of the page like in the screenshot:
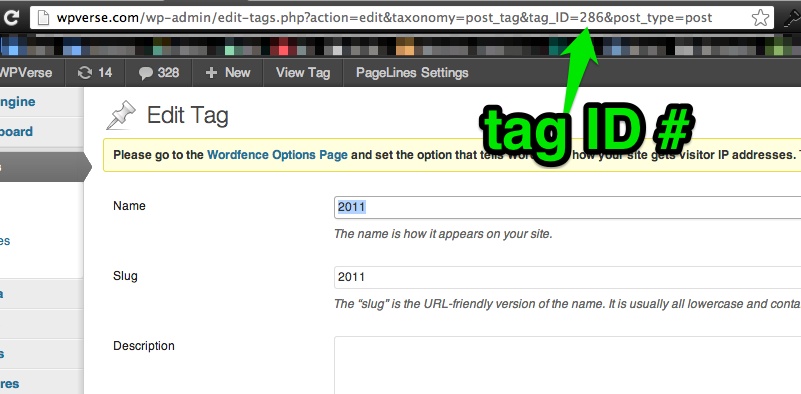
tag-id

And yes, there is also an plugin to show your ID numbers (newer more recently) updated plugin to show that info in the WP admin pages showing all your pages, posts, tags, categories, etc.

Publishing posts by Categories
So what if you want to show posts based on categories instead of tags? Give List Category Posts a try. This one was recently updated so it works with WordPress 3.1. It works in a similar way to the tag plugin but lets you use category names as well as ID numbers. In fact List Category will also support tags so if you’re looking for an all-in-one solution, give this one a try first.

The other way to publish “pages” of posts
Yes, there is another way to reproduce this type of site structure by simply using WordPress 3x’s navigation bar menu builder to create URL based queries for the tags or categories (example: /category/name-of-cateogry/). However using this method, you wouldn’t have the ability to add (type out) content around the posts either at the top or the bottom of the page.

Hide posts without a need for password
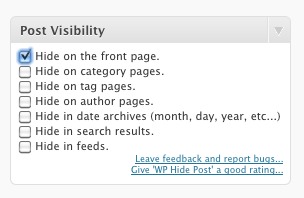
And the final plugin that you’ll want to try out is WP Hide Posts. This one might be helpful even if you don’t need to pull in posts into pages. With WP Hide Posts, you can hide certain posts from appearing on the home page or other post pages.

It’s useful if you want to write a “test” post that you didn’t want the general public to see yet on the home page. For example you had an announcement that you were working on with a copy writer but didn’t want to give them access to WordPress admin but wanted them to look at it first without the public seeing it.
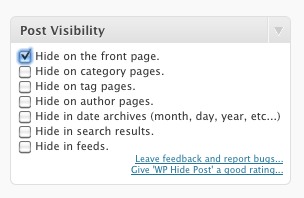
Wp hide posts

Think of it as a way to have a “quasi-hidden” posts category that doesn’t require a password for anyone to see that posts. You can email people the URL of that post without a password required. We’ve used WP Hide Posts on our P2 reloaded site to hide posts related to revision history that don’t need to appear on the home page.

Note that users may still be able to find your post if they are using a tag/category cloud widget, so that’s what we mean by “quasi-hidden” so if it’s something top secret, password protect it.

So we’ve talked a bit about four very powerful posts tools for WordPress that will let you expand the way you think posts normally work in WordPress. You can use these tools to write, organize, and publish information in WordPress that you normally wouldn’t think of.

Get it: Posts by Tags | Show IDs | List Category Posts | WP Hide Posts

The hardware behind WordPress.com revealed

After the widely covered DDoS attack on WordPress.com hosted blogs and Automattic’s efforts to thwart it; Matt Mullenweg in email to customers (and blog post), reveals the computing power behind WP.com’s infrastructure, “for WP.com we’re now at 8,921 CPU cores across 2,475 physical processors, 8,200 gigabytes of memory (RAM).”

He continues, “We’ve changed how we’ve done storage, but now that layer includes on its own 1.3 terabytes of RAM, 1.3 petabytes of storage, and 8.9 terabytes of solid state disks. (Plus Amazon S3, which we use as backup to our internal systems.) Also, we’re adding new servers constantly. :)”

Quick Tip: How to replace full posts with excerpts on home page

If you have seen a WordPress theme that you’d like to use but don’t like that it shows a full post and want to show only an excerpt? Don’t fret, as modifying the theme to show only excerpts is pretty easy to do.

This assumes that you’ve edited WordPress theme files before and I recommend you have a back up of your theme files that you can easily upload to fix any potential problems but other than that it’s straight forward.

In WordPress admin, open Appearance -> Editor -> and select Main Index (“index.php”).

Then find the code:

php the_content('Read the rest of this entry »'); ?>

and replace it with:

<?php the_excerpt(); ?>

Note this code maybe not always be in the index.php file, it may been in a theme specific loop file. If you’re an advanced user, your best bet maybe is to add this to the bottom of your functions.php page via the instructions at WP Recipes.

Bonus – WordPress post excerpt resources:
The second thing you’ll want to do is to install the Better Excerpt plugin that will let you customize the length of your excerpt and replace the […] with your own text plus a hyperlink to the full post.

If you need more information on posts/excerpts, here’s a great post at Rarst.net.

Update: if you want the quick and easy way, check out the Evermore plugin mini review…

Quick Tip: Show all your (blogroll) links on any page or post

The Links library (sometimes called the blogroll) is an often overlooked feature of WordPress but it can become a powerful ally if you have want to setup a resources “library” of outgoing links to other websites. Of course there’s the blogroll widget that will let you display these links on the sidebar. But how do you get these links into a page or post?

Here’s a super no brainer way to get all your links (a.k.a. Blogroll) created in WP admin to show up on any page or post by pasting in a simple shortcode into the editor. It’s aptly called Links Page and it works well so far. We’re using it for our new WordPress/LAMP jobs site…

Update: we also found another plugin called WP Render Blogroll Links. This one gives a little bit more flexibility that it allows you to specify which categories or turn off category headings.

Both of these plugins seem to work fine with WordPress 3.1.