New QuickLaunch Theme – free! (1.1 update)

It’s been ages, since I’ve posted something here at WPVerse. I’ve been quite busy working on unique and interesting WordPress themes that hopefully I’ll be able to share in the next few weeks.

In the past I’ve looked for a “coming soon” WordPress theme but I could find something that was “generic” or easy to edit. A lot of them had a count down timer but not everyone needs it. I also liked the idea of the LaunchEffectApp.com theme by my friends at Barrel NYC but I ultimately found it was too hard to use. So I decided to make a cool WordPress theme for free. It’s not going to kill LaunchRock.com anytime soon but it’s free!

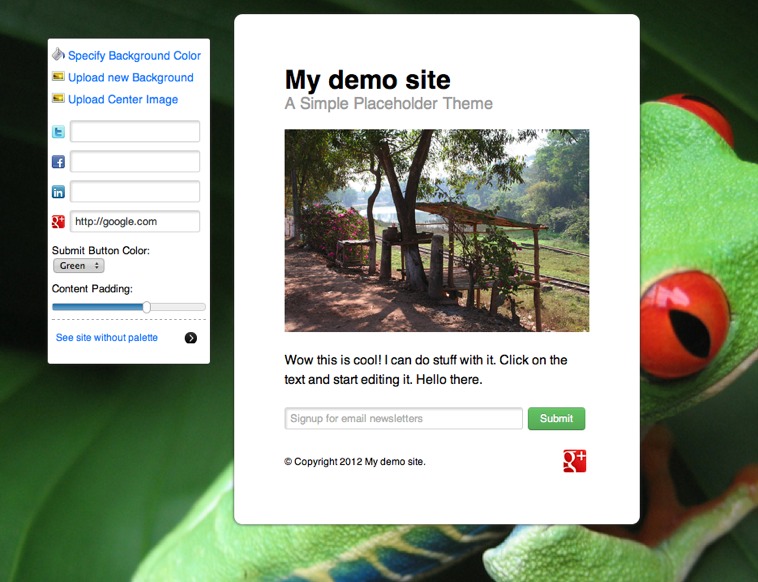
So here’s a screenshot of my new theme with the admin tool palette turned on:

Instructions: Download the theme ZIP file and upload to your WordPress site using WP admin and activate theme as usual.

Then look on the bottom of the WP admin bar and select “QuickLaunch” -> “Launch Designer”. The screen will switch to the preview edit mode. From that point you can edit the site name, tagline, and body text by clicking on those preview areas directly and start typing. When you see the pencil icon that means you’re ready to edit the text and do “live” or inline editing.

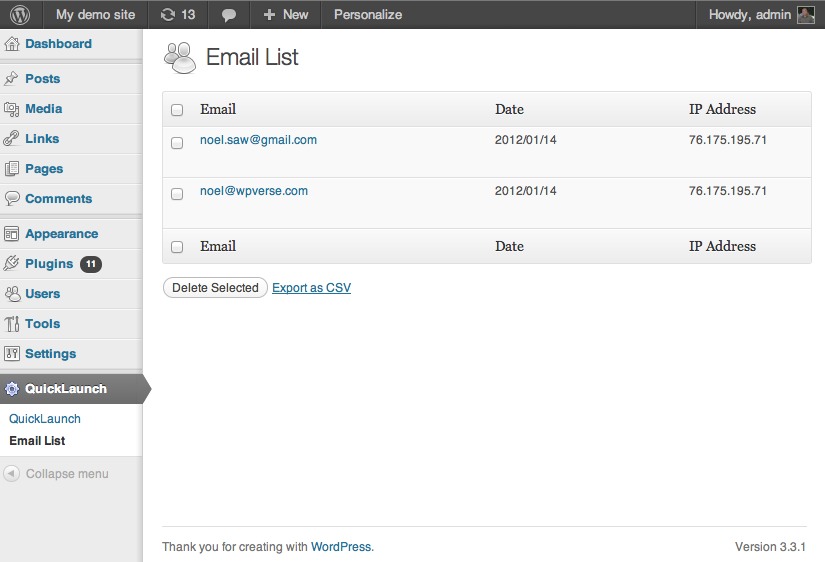
One of the easiest things you can do with QuickLaunch is to upload a background image or specify a solid background color.There are fields to specify your Facebook, Twitter, Google+, or Linkedin user profiles. You can also specify the color of the “Submit” button of the email collection box.  With v1.1, you can increase the padding of the center content module. Note the preview is slightly different then what you’ll see if you look at the actual saved site. And you can see submitted email addresses by clicking on the “Email List” option in “QuickLaunch” on the WP admin menu bar.

We hope you enjoy this theme! Please drop us a line if you use our theme as your splash/landing/squeeze page!

Download: QuickLaunch-1.1b.zip (Updated Feb. 27th) | Demo Site

Sequential Foundation Photo Gallery plugin

A client recently asked me if they could upload a bunch of photos onto a page or post and have WordPress automatically lay them out sequentially right next to each other without any gaps or spaces. Our first thought was that WordPress should already do this by default but we checked and yikes it doesn’t have that feature yet.

So our friend Wok at Thinkademic wrote this custom plugin for us that will let you upload a bunch of pictures for you neatly lined up in a row next to each other. There’s no fancy schmancy JQuery slider effects or transitions. The plugin just generates a plain old grid of pictures lined up next to each other.

Once you have the plugin uploaded and activated, simply click on photo media upload button built into the post/page editor to batch upload a bunch of pictures. You’ll have a choice of how many columns across and how you want the pictures sorted by.

You’ll want to pre-size your pictures with Photoshop or another image editor so they’re at least the same height. Depending on the width of the page, the plugin will show as many images that can fit into a row.

If you specify imagesize="thumbnail" in the gallery shortcode parameters, it will use whatever thubmnail value you have setup in your media settings.

Here’s some CSS that you can add to your theme or “My Custom CSS” plugin to help style the layout :
.thefoundation-gallery img { margin: 0 !important; padding: 0 !important; float: left;}

See the example at the bottom of this page…

The usual fine print…
As always with any open source software, use the plugin at your own risk. The plugin is offered “as-is” without any warranties. We recommend installing this on a test site and thoroughly trying it out before you apply it to your live site. We’ll try to answer any questions you have here in the comments but can’t guarantee a timely response.

Get it: SequentialGallery-1.0

Example gallery – images from InterfaceLift.com:

Adding Social Media to WordPress

What are the different ways that you can hook up WordPress and social media networks? Take a look at this presentation deck that I’ve uploaded to SlideShare that shows the various Social Media plugins and 3rd party apps that show how you can integrate social media networks with your WordPress site. Make sure you download the PDF and flip through each page to see the progressive steps.

Round up of Three Google+1 Plugins for WordPress

Yesterday we showed you how to add a Google+ profile widget to your site. Now let’s take a look at two new to us sharing plugins with Google+1 integration. The important thing to point out is the term “Google+” usually refers to the social network that in my (humble) opinion is a hybrid of Twitter and Facebook. Considering that Google’s has had two years to dissect their competitors and figure out the best of both worlds, they’ve managed to make something…”magical.”

Then moving on, there’s the “Google+1” button you see on a lot of websites (including our site) is a component of “Google+”. Think of “+1” as something similar to the Facebook like button. But this button keeps your history that just happens to have “+1” navigation button on your Google+ profile page that shows everyone all the pages you have “liked” by clicking on the “+1” buttons. I am sure there’s some privacy control for it but I haven’t dived into it.

The particular button I am using on this site is simply called “Google +1” by Yatko. If you do a search for “Google +1” on the WordPress plugin repository you’ll see quite a few choices. We tried quite a few plugins and this one seems to be the most compatible with different themes so make sure you find the plugin by the author Yatko.

Once it’s installed and activated, just drag the widget onto your sidebar to have it appear.

So what if you want to have a Google+1 button that appears as part of your social sharing button suite? Unfortunately our favorites Sharedaddy or Share and Follow have not been updated with it.

But we just found a new player in town called Digg Digg that happens to have a lot of the same features of Sharedaddy but throws in “+1” button.

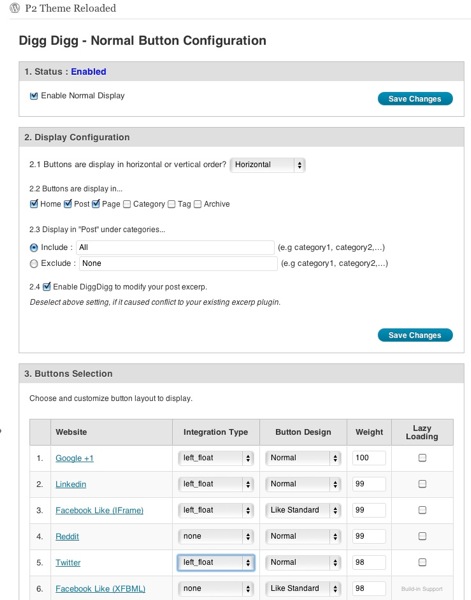
As you can see in the admin below there are a ton of choices, maybe too many choices.

Digg digg sharing

Like Share and Follow you can have it appear at the top of posts with different position options like floating (wrapping) with the content. Depending on your theme CSS you’ll have mixed luck with this. The fail-safe option is to select to have it appear at the bottom of the post so it avoids any mashups. The plugin also offers a “lazy loading” option so your post or page content loads before the javascript needed to render the sharing buttons. That way your page isn’t blank white while it’s waiting for the sharing assets and APIs to load.

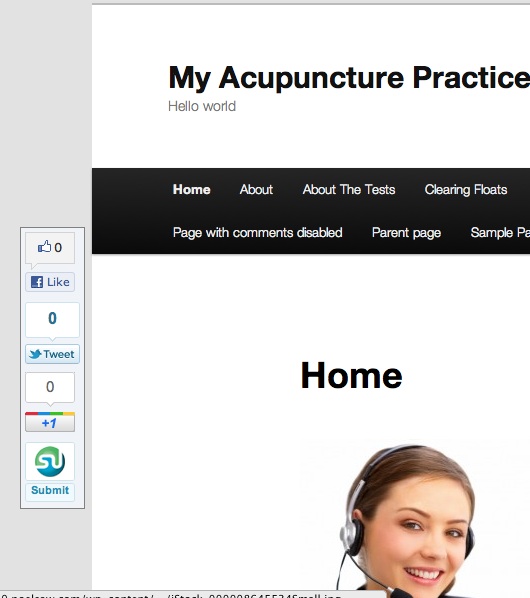
The next plugin we’ll take a quick look at is called “Twitter Facebook Social Share” by Kunal Chichkar. This plugin also now features the Google+1 button in addition to the usual Facebook, Twitter, Stumbleupon, etc. services. It’s unique in that the sharing buttons sit stationary on the side of your pages regardless of what position you are on the page. The advantage to this is that it a visitor doesn’t have to scroll up or down to share the post. Here’s a screenshot of how it looks like on a demo site:

Googleplus share

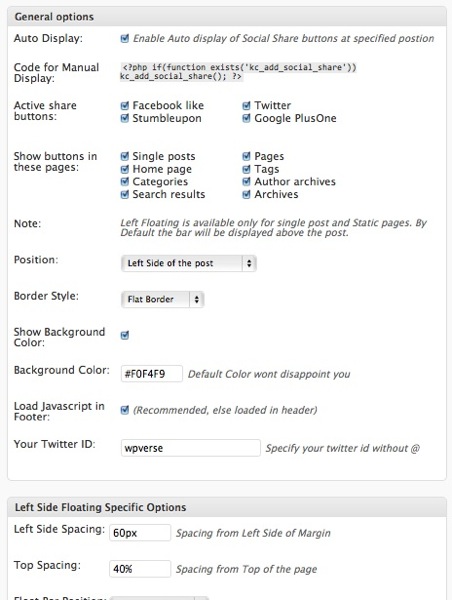
The plugin settings offer quite a few customization options including the ability for the plugin to load the script at the bottom of the page similar to lazy loading. You can also define the background color and turn on rounded corners for the box too. Here’s a screenshot of the options:

Tf social googleplus share2

So give these a try of either one of these Google+1 plugins for WordPress and let us know what think!

Get it: Google +1 | Digg DiggTwitter Facebook Social Share

Our Google+ Profile plugin – widget download

Have you jumped on the Google+ band wagon yet? We have! So in the last week or so we’ve been trying to get a popular but somewhat broken Google+ profile WordPress plugin called Google Cards. For whatever reason many WordPress users couldn’t get it to work on their sites.

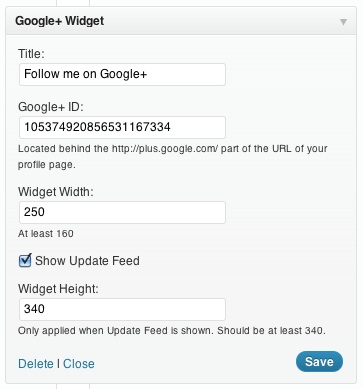
So we ran across a website offering a generic standalone widget at WidgetsPlus.com that seemed to work at least on a static HTML page. We tried to use the HTML Javascript Adder plugin that allows you to paste in JS code but that didn’t work. So we hired one of our WordPress developers to incorporate the functionality of that script into a self contained WordPress widget. You can download a beta of it here: Google+ Profile Widget 1.0a

Please let us know what you think. Make sure you delete your WordPress cache and minified files first.

How to add a sidebar in Twenty Eleven theme

A few weeks before the WordPress 3.2 general release came out, we linked up a beta copy of the Twenty Eleven theme with a download link so our readers could preview it on pre 3.2 sites.

And no doubt many of you have updated to WordPress 3.2 by now. And some of you may have noticed that Twenty Eleven for whatever strange reason doesn’t have a sidebar widget area on the inner pages?!

It’s one of those “what were they thinking?” questions we like to cynically ask.

Kevin Muldoon and Bart Surminski to the rescue as Kevin outlines around 4 steps to easily add the sidebar to Twenty Eleven theme on his WPMods.com site. This could be a great exercise if you’re a confident beginner who wants to hack a theme for the first time.

But if you just want the modified theme pre-baked, there’s also a link by Niraj in the comments section of that article so you can grab a copy of the theme with the widget enabled.

Visit: WPMods.com

MediaPass – a promising new content subscription plugin for WordPress

One of the biggest misconceptions of the web is that you can’t charge for content. But this trend is turning the tide as more media outlets like the New York Times and Financial Times are allowing people to read certain amount of content before having to pay. While the typical blogger isn’t writing the amount or quality of content or same quality as these publications there’s a lot of good stuff out there that just can’t always be supported by advertising.

So with the end of my spiel, we ran across a new WordPress plugin to help content creators create a paid content section for their site. The plugin is called MediaPass. It will let you “protect” pages, posts, and media/video files in different ways, such as overlaying the whole page with a dialog box or showing an excerpt. Visitors will be kindly reminded to pay up. The plugin is currently in version 1.0 so there are some rough edges but we think this plugin has a lot of potential to be a great plugin.

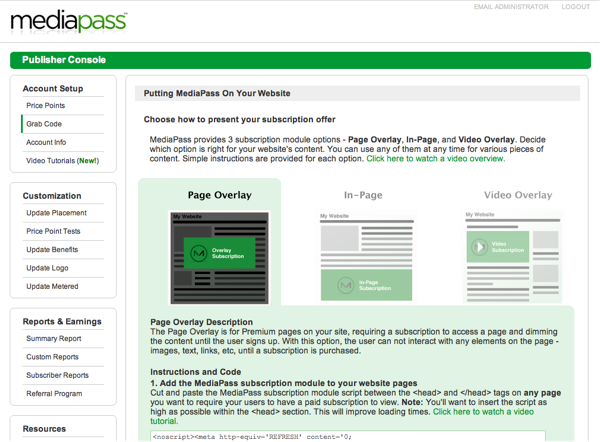
In the screenshot below are some of the different options for putting up your “paywall” on your WordPress site.

Mediapass v1

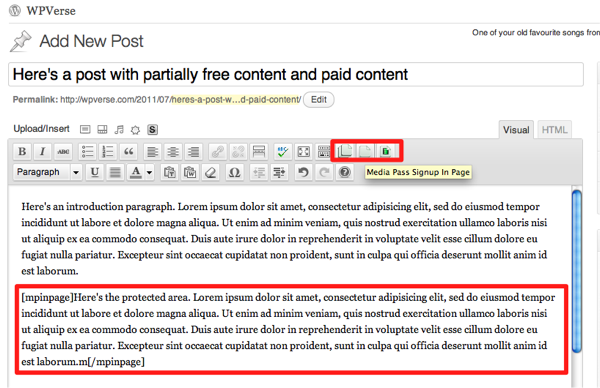
Once you install the plugin from the WordPress.org repository, you’ll need to head over to the MediaPass.com site to register for an account. Once your account is confirmed, you’ll go back to WordPress admin and enter in your credentials to the plugin settings. Next, you’ll need to add some shortcode to your posts or pages through the rich text editor buttons. Unfortunately, this part is not the most intuitive as the shortcode generator buttons on the rich text editor aren’t the most obvious. We wish there was a simple check box module as part of the post or page editor screen that could do the entire page overlay protection.

Mediapass v1 editor

So what does MediaPass charge and how do I get my money? MediaPass will take around 35% of your subscription fee to handle the processing and technology infrastructure. And yes, they can take either PayPal or regular credit cards. For now, they’ll send you a monthly check but we hope they’ll have direct deposit in the future. To sum it up, MediaPass has a lot of potential and is worth exploring if you’re willing to work through some of the manual steps.

Full disclosure: MediaPass is a sponsor on my Los Angeles based WordPress meetup groups.

Get it: MediaPass plugin


Plugin of the Week: My Custom CSS

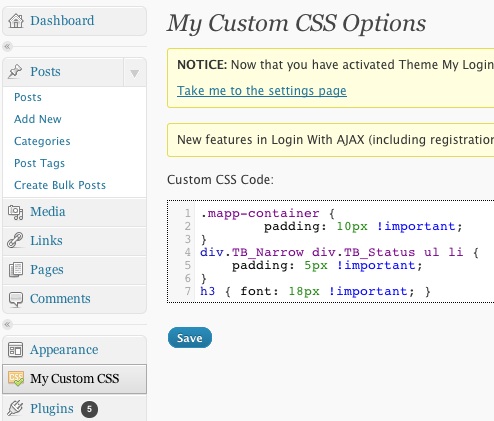
Have you ever had to hack the CSS for a WordPress theme or plugin only to later upgrade the theme or plugin and realized you lost your changes? Wouldn’t it be great if someone made a plugin that let you keep the CSS modifications stay intact whenever you updated your theme or plugin?

My custom css

It took us a while to find something like this but we found “My Custom CSS” plugin by Salvatore Noschese. This little great WordPress plugin tkeeps your custom CSS override regardless of what theme or plugin you’re using. Remember that if a certain class isn’t working, you may need to add the “!important” tag like in the screenshot above.

Get it: My Custom CSS


Sharedaddy adds Linkedin

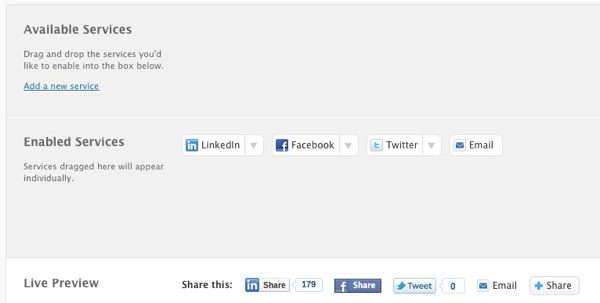
If you haven’t updated your Sharedaddy WordPress plugin recently, it might a good time to do so because they’ve just added Linkedin as another sharing service. It’s quite useful if you’re running a business or professional related blog or site. Note that as far as we can tell, the Jetpack version of Shareaddy hasn’t been updated with the Linkedin share button yet. Once you’ve gotten the latest copy of Sharedaddy, add Linkedin by going to Settings -> Sharing and drag down the Linkedin sharing button down to “Enabled Services.”

Sharedaddy linkedin

And make sure to click on “Save Changes,”

If you haven’t chosen a social sharing plugin, give Sharedaddy a try.

Get it: Sharedaddy plugin