Speeding up your WordPress site with MaxCDN (Advanced users)

In the past I’ve written about WPCDN.com and how WPVerse uses their service. I recently needed to make some changes to my account and since I was never aware of a self service control panel, I wrote to WPCDN but didn’t hear back from them so I decided it was expand my horizons. I met the MaxCDN team at WordCampLA last year so was curious to see what their system could do.

This article is meant as a quick overview for advanced users, so I’ll post more details later but here are my impressions so far of MaxCDN. If you’re familiar with setting up CDN before, you’ll be able to be on their system in less than an hour. There was a delay getting my account “welcome” email but once I was in their self service control panel, I was able to create a new pull zone in less than 15 minutes.

I think the UI could use a little bit more hand holding or help messages. For example there’s a field called “Custom CDN Domain” that is optional if you haven’t setup your own CDN sub-domain in your DNS but it’s not explained you can fill it out later. They do provide a “temporary sub-domain” for after you submit the form. I filled in the custom CDN domain name in my domain registrar’s (GoDaddy) but for whatever reason the images didn’t seem to be showing up at the URL but their “temporary” sub-domain worked fine.

I also had to switch to W3C Total Cache because the CDN feature in WP Super Cache seems to be tied into the page caching features being enabled and this particular project had a lot of Ajax related features on the home page that I didn’t want to try page caching with yet. All in all, so far I am happy with MaxCDN.

Adding Social Media to WordPress

What are the different ways that you can hook up WordPress and social media networks? Take a look at this presentation deck that I’ve uploaded to SlideShare that shows the various Social Media plugins and 3rd party apps that show how you can integrate social media networks with your WordPress site. Make sure you download the PDF and flip through each page to see the progressive steps.

MediaPass – a promising new content subscription plugin for WordPress

One of the biggest misconceptions of the web is that you can’t charge for content. But this trend is turning the tide as more media outlets like the New York Times and Financial Times are allowing people to read certain amount of content before having to pay. While the typical blogger isn’t writing the amount or quality of content or same quality as these publications there’s a lot of good stuff out there that just can’t always be supported by advertising.

So with the end of my spiel, we ran across a new WordPress plugin to help content creators create a paid content section for their site. The plugin is called MediaPass. It will let you “protect” pages, posts, and media/video files in different ways, such as overlaying the whole page with a dialog box or showing an excerpt. Visitors will be kindly reminded to pay up. The plugin is currently in version 1.0 so there are some rough edges but we think this plugin has a lot of potential to be a great plugin.

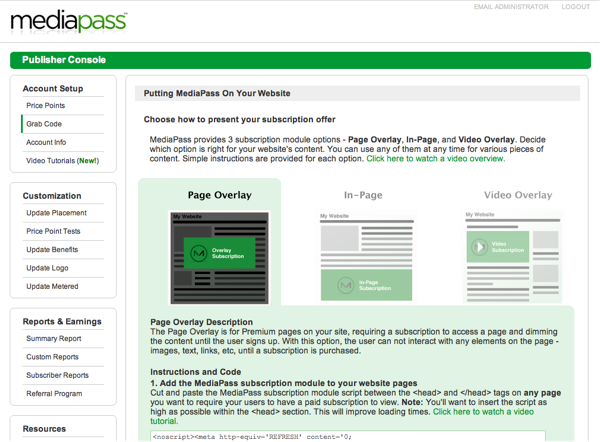
In the screenshot below are some of the different options for putting up your “paywall” on your WordPress site.

Mediapass v1

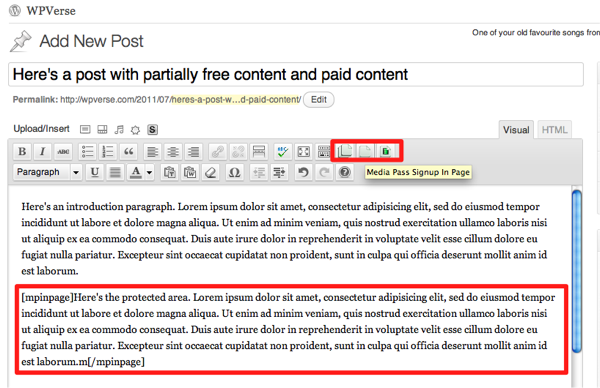
Once you install the plugin from the WordPress.org repository, you’ll need to head over to the MediaPass.com site to register for an account. Once your account is confirmed, you’ll go back to WordPress admin and enter in your credentials to the plugin settings. Next, you’ll need to add some shortcode to your posts or pages through the rich text editor buttons. Unfortunately, this part is not the most intuitive as the shortcode generator buttons on the rich text editor aren’t the most obvious. We wish there was a simple check box module as part of the post or page editor screen that could do the entire page overlay protection.

Mediapass v1 editor

So what does MediaPass charge and how do I get my money? MediaPass will take around 35% of your subscription fee to handle the processing and technology infrastructure. And yes, they can take either PayPal or regular credit cards. For now, they’ll send you a monthly check but we hope they’ll have direct deposit in the future. To sum it up, MediaPass has a lot of potential and is worth exploring if you’re willing to work through some of the manual steps.

Full disclosure: MediaPass is a sponsor on my Los Angeles based WordPress meetup groups.

Get it: MediaPass plugin


Plugin of the Week: My Custom CSS

Have you ever had to hack the CSS for a WordPress theme or plugin only to later upgrade the theme or plugin and realized you lost your changes? Wouldn’t it be great if someone made a plugin that let you keep the CSS modifications stay intact whenever you updated your theme or plugin?

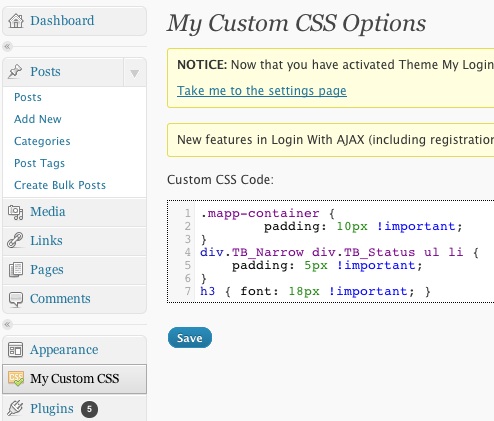
My custom css

It took us a while to find something like this but we found “My Custom CSS” plugin by Salvatore Noschese. This little great WordPress plugin tkeeps your custom CSS override regardless of what theme or plugin you’re using. Remember that if a certain class isn’t working, you may need to add the “!important” tag like in the screenshot above.

Get it: My Custom CSS


Plugin of the Week: Sharedaddy plugin

A few weeks ago we looked at Automattic’s Jetpack plugin which adds a plethora of new features for WordPress. One of the more useful plugins incliuded in this swiss army knife of plugins is the Sharedaddy plugin which adds “share” buttons for Facebook, Twitter, Digg, and others onto your WordPress site. Did you know you can get Shareaddy as a standalone plugin too?

Once you install the Sharedaddy plugin (alone or as part of Jetpack), you’ll need to configure which types of sharing you’ll want to show on your WordPress site. You have your choice of Stumbleupon, Facebook, Twitter, Email, Digg, Reddit, and Print services.

Here’s where our (two) tips/tricks comes in:
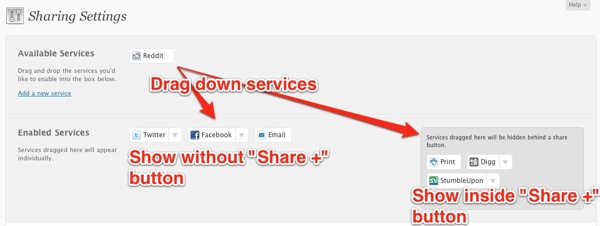
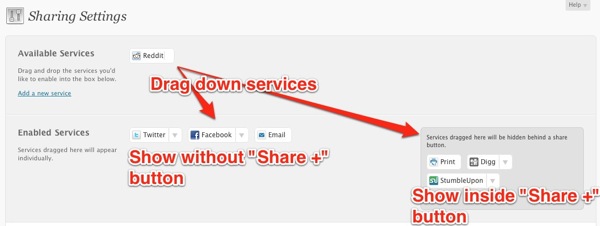
You’ll notice two areas below where you can drag the type of sharing services you want to enable. If you drag the sharing service icons to the left, they’ll be shown in order exactly as you see on the screen. If you drag the icons over to the right, the services will be hidden under a main “Share+” button.

This part might be confusing for users so here’s a quick diagram. You can see the results of this on the bottom of this actual post.

Sharedaddy services

If you’re an advanced user looking to customize the plugin, we converted Sharedaddy into a shortcode plugin for use in one of our client’s custom themes and it has worked well so far. We were able to use CSS to add a colored background and make alignment modifications without much problems.

We were previously fans of the Sociable plugin but with the total lack of paid support provided by WPMU (Inscub) and the developer, we have moved on to Sharedaddy. It is probably the best out of the box solution out there for easy content sharing on your WordPress site.

Update plus 2nd tip: The biggest issue we ran into is that once the plugin is installed and activated, it doesn’t automatically turn on a set of default sharing buttons. So if you just activate it, you still need to define the social networks you want to show up.

We can see a situation where a user may just activate the plugin and forget to actually add popular networks like Facebook and Twitter. So our second tip, is that if you’re moving your site to another server, don’t forget to check and add the services manually otherwise you won’t notice they’re not there until you’re reading your published pages. Yes, we learned this the hardway! Also this would most likely apply to the version of Sharedaddy bundled with Jetpack.

Get it: Sharedaddy plugin

Quick Tip: How to replace full posts with excerpts on home page

If you have seen a WordPress theme that you’d like to use but don’t like that it shows a full post and want to show only an excerpt? Don’t fret, as modifying the theme to show only excerpts is pretty easy to do.

This assumes that you’ve edited WordPress theme files before and I recommend you have a back up of your theme files that you can easily upload to fix any potential problems but other than that it’s straight forward.

In WordPress admin, open Appearance -> Editor -> and select Main Index (“index.php”).

Then find the code:

php the_content('Read the rest of this entry »'); ?>

and replace it with:

<?php the_excerpt(); ?>

Note this code maybe not always be in the index.php file, it may been in a theme specific loop file. If you’re an advanced user, your best bet maybe is to add this to the bottom of your functions.php page via the instructions at WP Recipes.

Bonus – WordPress post excerpt resources:
The second thing you’ll want to do is to install the Better Excerpt plugin that will let you customize the length of your excerpt and replace the […] with your own text plus a hyperlink to the full post.

If you need more information on posts/excerpts, here’s a great post at Rarst.net.

Update: if you want the quick and easy way, check out the Evermore plugin mini review…

How to host your WordPress site on Amazon Web Services

One of our readers asked us a great question on Twitter, “could they host their site on a CDN (Content Delivery Network)?” Our answer: yes and no, a CDN’s main purpose is deliver static content (images, CSS, Javascript, and ZIP files) from the closest geographically based server to a particular user on your website. A traditional WordPress by definition is going to be non-static (unless you’re using WP Super Cache or W3 Total Cache).

If you really want the fastest WordPress site out there, putting your WordPress site on Amazon Web Services’ (AWS) cloud platform would probably be the way to go. Now you ask, how do you do that?

We found some good answers (and questions) on this particular WordPress Answers thread from Stack Exchange. Read more…

Our friend at Freelance CTO, John Shiple sent us three other sets of guides:

Before you run out and do this, we think setting up your WordPress site on Amazon Web Services is overkill for 98% of the WordPress users out there. We recommend starting with a fast web host with a toll-free support number, activate the WP Super Cache and Autoptimize plugins, and sign up for WP CDN. We’d be willing to bet good money that’s going to work be plenty fast enough for most WordPress sites.

Four WordPress web hosting solutions tried and tested

Here’s a quick round up of our experiences with four different web hosting providers. Two of them are more well known providers where as the other two are lesser known but we were intrigued by some of their features.

We’re also including an almost scientific performance benchmark at the end of the review. We wanted to find out at least on just one given day, who had the fastest web server. As with any review and benchmark, your “mileage” and experience may vary from ours.

MediaTemple
We’ve been using MediaTemple’s Grid-Service (gs) plan for about two years now. Their pricing starts at $20/month is on the higher end of the spectrum. They don’t give you unlimited bandwidth or disk space but it’s plenty enough for most people. They also limit the amount of domains to 100 per Grid-Service account. MediaTemple were pioneers in the distributed server model a.k.a. cloud which usually means speed but unfortunately we’ve noticed a slow down in their speed.

On the back end, MediaTemple use a proprietary control panel instead of the ubiquitous cPanel. It’s fairly easy to use and straight forward. We like that they give you one page all you need to know about your server info page that we wish other hosts would follow. One thing that annoyed us is that after installing a new domain, in order to start the WordPress installation process you have to login via FTP and delete the “HTML” folder. When we complained about it, they said that was their standard procedure.

A big advantage of MediaTemple is their toll-free 800 tech support number where on most calls we’ve noticed they pick up by the third ring unless there’s some crisis going on.

Our biggest issue is with MediaTemple in the past six months we noticed on the first initial connection to our site, there would be a 1 plus second delay before our site would start loading. We even started a thread in Get Satisfaction website that never got fully resolved. Update: they finally did respond in the Get Satisfaction thread, but there’s no much they’re willing to do about it at this point.

And as of yesterday, they’ve had a serious outage on the “cluster” that some of our sites are on and that’s also caused hundreds of their other customer’s sites to fail. So at this point based on our experience we can’t recommend MediaTemple’s Grid Service. They do offer virtual server plans that may be more reliable and faster than their grid servers.

Dreamhost
We’ve used both Dreamhost’s regular shared hosting and virtual private server (VPS) hosting system. The prices for shared hosting includes unlimited storage and bandwidth (transfer) at a reasonable $9/month and the virtual hosting resources starts at $15/month.

Dreamhost has their own proprietary control panel, so if you’re used to cPanel, there’s a little bit of a learning curve. The live support chat is integrated into it so it’s usually easy to get a hold of support but we’ve encountered incidents were their live chat didn’t have any operators available.

The neat thing about Dreamhost is that you can instantly “move” one of your websites to the VPS system with a few clicks. So if one of your sites starts getting a lot hits, you can move that site over to VPS quickly. On the downside, we’ve had some issues with their URL/domain mirroring working fully with the VPS, both times the mirror stopped working without a real explanation from Dreamhost tech support.

In terms of support, you’re limited to live chats and creating support tickets. If you want them to call you back it’s $10 for 3 calls per month and once you signup, they put you on a subscription rather than a one time charge.

We’ve also noticed if you’re purely on the shared hosting plan, performance can be spotty at times as we’ve noticed internal server 500 errors when processing certain WordPress admin pages.

Vexx Hosting
Vexx is a Canadian based company with offices in New York. What fascinated us about them is they claim is a cloud like platform on their shared hosting plan. We weren’t thrilled with their misleading $3.99/month pricing plastered on the home page, that’s good only if you pay for 12 months in advanced, otherwise you’ll be paying $7 per month. Vexx uses cPanel and the Fantastico script installer so some users may already be up to speed when you signup.

We’ve created a couple of WordPress web sites that went into production using cPanel on Vexx in a relatively easy and pain-free way.

The biggest glitch wasn’t related to WordPress as one of the first projects we put on their system was actually Drupal site transfer where our system administrator wanted to restore a database via remote login terminal. Even though Vexx hosting advertises SSH login as a standard feature, they didn’t want to turn it on for us and it took about 3 days for the whole thing to be resolved after one or two reminder emails to their tech support.

MDD Hosting
We wanted to try MMD Hosting because they’re using the LiteSpeed web server instead of the much more common Apache. According to LiteSpeed’s developers, their system can be up to 9x faster than Apache. The beautiful thing is the Litespeed was built on the Apache foundation so it works well with WordPress.

MDD charges $7.50/month for their basic plan which includes a relatively paltry 10 gbytes of storage and respectable 240 gbytes of bandwidth. MDD like Vexx uses cPanel as well but they use a lesser known script installer called Softaculous instead of the ubiquitous Fantastico.

We haven’t had a need to contact MDD Hosting yet so we can’t rate their support department yet.

“Semi-Scientific” Performance Testing
We used a third-party tool called Pingdom to measure WordPress sites hosted on all four providers. Pingdom’s advantage is that you’re testing sites from their data center which should make results more consistent than trying to measure it from a DSL or cable modem connection.

For the tested sites, we attempted to make all four sites virtually the same. On all four web hosts, we performed a fresh installation of WordPress. We then activated the Thematic theme and imported a copy of the WPVerse site using the standard WP importer plugin. Then we turned off all plugins. We ran three tests for each host in the morning and three more in the evening for all four hosts within a 30 minute time frame.

Click image to see a full view:
Website hosting dreamhost mediatemple2

So in this round of tests, Vexx was the winner with the fastest page load times on an overall average as well as adjusted average when the longest load time was thrown out. Next up was MDD and Dreamhost. We were slightly surprised to see MediaTemple in fourth place though.

We won’t say these test results are fully conclusive nor a 100% scientific because on any given day depending on internet congestion and amount of client load on the web host’s infrastructure, these numbers could flip easily. We’d also have to first fix the MDD test site to make sure that 1 missing object was loading and then we’d have to test the sites every day for at least one month to get really solid numbers.

Summary
So to recap, we wish both Media Temple and Dreamhost would work on the issues we’ve mentioned earlier. We’re sure some of their customers have never experienced our pain points. I have to give them some kudos for keeping the lights on and most of their customer’s happy enough to stick around. We haven’t been using Vexx or MDD long enough to give them two solid thumbs up yet but they’re worthy of trying out if you’re not happy with your current web host.